Last verified: October 2026 against Red Hat's registration and Simple Content Access documentation and the RHEL 10.0 release notes.
We encountered the error message ‘*This system is not registered with an entitlement server*, *You can use “rhc” or “subscription-manager*” to register’. On CentOS Stream 9 Linux system while trying to perform package installations. For RHEL, this usually is an indication that your system is not registered with Red Hat’s subscription management service. ``` $ sudo dnf clean all Updating Subscription Management repositories. Unable to read consumer identity This system is not registered with an entitlement server. You can use "rhc" or "subscription-manager" to register. 21 files removed ``` Here is how we solved the issue on the system. Open the following file for editing: ``` sudo vi /etc/dnf/plugins/subscription-manager.conf ``` Change from `enabled=1` to `enabled=0`: ``` [main] enabled=0 # When following option is set to 1, then all repositories defined outside redhat.repo will be disabled # every time subscription-manager plugin is triggered by dnf or yum disable_system_repos=0 ``` You can then update package cache and try install your packages. For RHEL system, run the following command to register your system with the Red Hat Subscription Manager: ``` sudo subscription-manager register --usernameNo attach step is needed after registering. Simple Content Access is now the default for all Red Hat accounts, so a registered system can use the content its account is entitled to straight away. `subscription-manager attach --auto` from older guides was deprecated in RHEL 9.5 and the attach commands were removed in RHEL 10.
Check that registration was successful: ``` sudo subscription-manager status ``` To enable a specific repository, run: ``` sudo subscription-manager repos --enable=Last verified: October 2026 against Red Hat's RHEL 9 system-wide cryptographic policies guide and the sshd\_config manual.
On Red Hat Enterprise Linux 9 (RHEL 9 / Rocky Linux 9 / AlmaLinux 9 etc.), SSH configuration is primarily managed through system-wide crypto policies. Direct settings in /etc/ssh/sshd\_config for KexAlgorithms, Ciphers, etc., are often ignored unless you properly override the policy. ### 1. Recommended: Add Curve25519 (preferred) and Diffie-Hellman group exchange **Curve25519-sha256** (and its @libssh.org variant) is already enabled by default in RHEL 9 and is the modern, secure choice. diffie-hellman-group-exchange-sha256 is also generally available and reasonably secure. Create a drop-in config. Red Hat's guidance is to use a two-digit prefix smaller than 50 so the file is read before `50-redhat.conf` (which pulls in the crypto policy). sshd uses the **first** value it reads for each keyword: ```bash sudo mkdir -p /etc/ssh/sshd_config.d sudo tee /etc/ssh/sshd_config.d/49-custom-kex.conf << EOF # Only offer these KEX algorithms (the client chooses the order) KexAlgorithms curve25519-sha256,curve25519-sha256@libssh.org,diffie-hellman-group-exchange-sha256,diffie-hellman-group14-sha256,diffie-hellman-group16-sha512 EOF ``` ### 2. Test the config ```bash sudo sshd -t ``` If no errors, reload SSH: ```bash sudo systemctl reload sshd ``` ### 3. Temporarily allow legacy algorithms (if needed for old clients/servers) Legacy algorithms (e.g., SHA-1 based ones like diffie-hellman-group1-sha1 or older group-exchange) are disabled for security. **Best temporary option** (least impact): ```bash # Append legacy KEX to OpenSSH's built-in default list sudo tee /etc/ssh/sshd_config.d/48-legacy-kex.conf << EOF KexAlgorithms +diffie-hellman-group-exchange-sha1,diffie-hellman-group1-sha1 EOF ``` Because 48-legacy-kex.conf is read first, its KexAlgorithms line is used instead of the one in 49-custom-kex.conf while it exists. Test with `sudo sshd -t`, reload sshd, and delete the file when the old clients are gone. Or use the broader (but riskier) **LEGACY** crypto policy: ```bash sudo update-crypto-policies --set LEGACY sudo reboot ``` **Warning**: LEGACY weakens many other things system-wide (not just SSH). Revert with `sudo update-crypto-policies --set DEFAULT` and reboot when done. Red Hat recommends a reboot after changing the policy so every service picks it up. ### Verification commands ```bash # Available KEX algorithms ssh -Q kex # Effective configuration used by sshd sudo sshd -T | grep -E '^(kexalgorithms|ciphers|macs)' # Test connection ssh -v user@yourserver ``` ### Notes for your homelab / self-hosted setup - Prefer **drop-in files** under /etc/ssh/sshd\_config.d/ (numbered < 50, for example 49-\*.conf, so they are read before Red Hat’s 50-redhat.conf; the first value read wins). - After any change: sshd -t → systemctl reload sshd. - If you have specific old clients (e.g., very old Windows, network devices, or RHEL 6-era), the + syntax to append is safest. #### Sources - [https://docs.redhat.com/en/documentation/red\_hat\_enterprise\_linux/9/html/security\_hardening/using-the-system-wide-cryptographic-policies\_security-hardening](https://docs.redhat.com/en/documentation/red_hat_enterprise_linux/9/html/security_hardening/using-the-system-wide-cryptographic-policies_security-hardening) - [https://man.openbsd.org/sshd\_config](https://man.openbsd.org/sshd_config) # Linux - Commands to KnowLast verified: October 2026 against the current man pages (tar, touch, useradd, userdel, groupadd, groupdel) for RHEL / Rocky Linux.
This is a quick version of commands to be aware of. #### System information `uname -a` : Displays all system information. `hostnamectl` : Shows current hostname and related details. `lscpu` : Lists CPU architecture information. `timedatectl status` : Shows system time. #### System monitoring and management `top` : Displays real-time system processes. `htop` : An interactive process viewer (needs installation; on RHEL / Rocky Linux it comes from the EPEL repository). `df -h` : Shows disk usage in a human-readable format. `free -m` : Displays free and used memory in MB. `kill [PID]` : Terminates a process (sends SIGTERM by default). #### Running commands `| Generating public/private rsa key pair. Enter file in which to save the key (/root/.ssh/id\_rsa): /root/.ssh/id\_rsa already exists. Overwrite (y/n)? |
| Generating public/private rsa key pair. Enter file in which to save the key (/root/.ssh/id\_rsa): Enter passphrase (empty for no passphrase): Enter same passphrase again: Your identification has been saved in /root/.ssh/id\_rsa Your public key has been saved in /root/.ssh/id\_rsa.pub The key fingerprint is: SHA256:JoMN/cxvsqZWBHws4eyrU5Q0F0qRe//44qdrrjiQmbU root@client01 The key's randomart image is: +---\[RSA 3072\]----+ | .+=.. | | =B.+ | | ..=O | | ==+o | | = E=... | | o... oo | | ..o..++ o | | .oo+o==\*. | +----\[SHA256\]-----+ You have mail in /var/spool/mail/root |
| /usr/bin/ssh-copy-id: INFO: Source of key(s) to be installed: "/root/.ssh/id\_rsa.pub" The authenticity of host 'server02 (192.168.x.x)' can't be established. ED25519 key fingerprint is SHA256:oZnvrgY+2Xpd2/huaffvzLMBAgI52AMPUmq/LPLIXbE. This key is not known by any other names Are you sure you want to continue connecting (yes/no/\[fingerprint\])? yes /usr/bin/ssh-copy-id: INFO: attempting to log in with the new key(s), to filter out any that are already installed /usr/bin/ssh-copy-id: INFO: 1 key(s) remain to be installed -- if you are prompted now it is to install the new keys remuser@server02's password: tput: No value for $TERM and no -T specified tput: No value for $TERM and no -T specified tput: No value for $TERM and no -T specified tput: No value for $TERM and no -T specified tput: No value for $TERM and no -T specified tput: No value for $TERM and no -T specified tput: No value for $TERM and no -T specified Number of key(s) added: 1 Now try logging into the machine, with: "ssh 'remuser@server02'" and check to make sure that only the key(s) you wanted were added. |
Continued in [Linux - Bag of Tricks (Part 2): Certificates, Databases, Disks & Boot](https://docs.thehomestack.io/books/linux/page/linux-bag-of-tricks-part-2-certificates-databases-disks-boot).
# Linux - Bag of Tricks (Part 2): Certificates, Databases, Disks & BootThis page continues [Linux - Bag of Tricks](https://docs.thehomestack.io/books/linux/page/linux-bag-of-tricks).
### Create a CERT First, you need to generate the private key and the Certificate Signing Request (CSR). You can do this via the openssl command: ```shell openssl req -nodes -newkey rsa:2048 -keyout privatekey.key -out mail.csr ``` Then, generate a signing request ```shell openssl x509 -req -days 365 -in mail.csr -signkey privatekey.key -out secure.crt ``` Create a localhost cert on the server ```shell openssl req -newkey rsa:2048 -nodes -keyout /etc/pki/tls/private/localhost.key -x509 -days 365 -out /etc/pki/tls/certs/localhost.crt ``` #### Mariadb Log Rotate If log file is large, try if the logrotate logrotate --force /etc/logrotate.d/mariadb #### MySQL Fail to Start If MySQL does not restart, it probably will not as the index of the log files will not be changed| cd /var/lib/mysql mv ib\_logfile0 ib\_logfile0.old mv ib\_logfile1 ib\_logfile1.old systemctl restart mariadb |
Last verified: October 2026 against the sudoers manual (sudo.ws).
### What is Cmnd\_Alias? Cmnd\_Alias (Command Alias) is a feature in /etc/sudoers (and files in /etc/sudoers.d/) that lets you **group multiple commands** under a single, easy-to-read name. Instead of repeating long command paths many times, you define the group once and then reference the alias name in your user permission rules. This makes the sudoers configuration: - Much cleaner and more readable - Easier to maintain (add/remove commands in one place) - Less error-prone It is one of four main alias types in sudoers: - User\_Alias — groups of users - Host\_Alias — groups of hosts - Runas\_Alias — groups of users to run as - **Cmnd\_Alias** — groups of commands (this one) ### Basic Syntax ```bash Cmnd_Alias ALIAS_NAME = /full/path/to/command1, \ /full/path/to/command2 arg1 arg2, \ /full/path/to/command3 ``` Rules: - Alias name **must** start with a capital letter and can contain uppercase letters, numbers, and underscores (e.g., API\_SERVICE, SYSTEMCTL\_API). - Always use **full absolute paths** to commands (never just systemctl). - You can continue long lines with a backslash \\. - You can include other Cmnd\_Alias names inside another one. ### Example for Your api.service (Recommended Version) Create or edit the file with `sudo visudo -f /etc/sudoers.d/10-deploy-api`: ```bash # Command alias for managing the api.service safely Cmnd_Alias API_SERVICE_CMDS = /usr/bin/systemctl start api.service, \ /usr/bin/systemctl stop api.service, \ /usr/bin/systemctl restart api.service, \ /usr/bin/systemctl status api.service # Grant the deploy user passwordless access to only these commands deployuser ALL=(ALL) NOPASSWD: API_SERVICE_CMDS ``` This is cleaner than listing the four commands directly on the user line. ### More Flexible Example (Allow Any Action on the Specific Service) If you want the deploy user to run **several** systemctl actions on api.service, do **not** use a wildcard such as `/usr/bin/systemctl * api.service`. In sudoers, wildcards in command arguments match any characters, including spaces, so that rule does not limit the user to api.service. It also matches, for example, `systemctl stop sshd.service api.service` or `systemctl edit api.service` (which opens an editor as root). List each allowed command explicitly (as in the example above), or on sudo 1.9.10 and later (check with `sudo -V`) use a regular expression, which must start with `^` and end with `$`: ```bash Cmnd_Alias API_SERVICE_CMDS = /usr/bin/systemctl ^(start|stop|restart|reload|status) api\.service$ deployuser ALL=(ALL) NOPASSWD: API_SERVICE_CMDS ``` This allows only the listed actions on api.service. ### How to Use It in Your Setup - Create the file: ```bash sudo visudo -f /etc/sudoers.d/10-deploy-api ``` - Paste the Cmnd\_Alias + user rule above. - Set correct permissions: ```bash sudo chmod 0440 /etc/sudoers.d/10-deploy-api ``` - Test it: ```bash sudo -l -U deployuser ``` 1. You should see the allowed commands listed for deployuser. Then update your PowerShell script to use deployuser (instead of root). ### Why This Is Better Than the Original Line Your original line: ```bash deployuser ALL=(ALL) NOPASSWD: /usr/bin/systemctl stop api.service, /usr/bin/systemctl restart api.service, /usr/bin/systemctl status api.service ``` Works fine, but using Cmnd\_Alias is preferred when: - You have more than 2–3 commands - You might want to add more actions later - You manage multiple services (you can create one alias per service) #### Sources - [https://www.sudo.ws/docs/man/sudoers.man/](https://www.sudo.ws/docs/man/sudoers.man/) # Storage & LVM Adding disks, growing LVM volumes, swap and other storage tasks. # Linux - How to Increase the size of a Linux LVM by adding a new disk **Important Notes:** Be very careful when working with the commands in this article as they have the potential to cause a lot of damage to your data. If you are working with virtual machines make sure you take a snapshot of your virtual machine beforehand, or otherwise have some other form of up to date backup before proceeding. It could also be worth cloning the virtual machine first and testing out this method on the clone. Throughout my examples I will be working with a VMware virtual machine running Debian 6, this was set up with a 20gb disk and we will be adding a new 20gb disk for a total LVM size of 40gb. Although my examples make use of virtual machines, this method would work with a physical server as well if you have added a new physical disk in and want to use that to expand the LVM. ## Identifying the partition type As this method focuses on working with LVM, we will first confirm that our partition type is actually Linux LVM by running the below command. ``` fdisk -l ``` [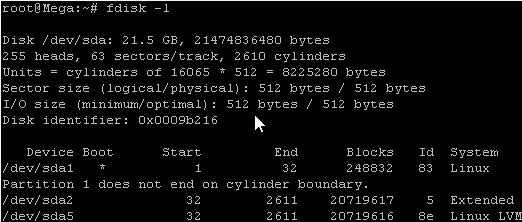](https://docs.thehomestack.io/uploads/images/gallery/2024-09/UeTimage.png) As you can see in the above image /dev/sda5 is listed as “Linux LVM” and it has the ID of 8e. The 8e hex code shows that it is a Linux LVM, while 83 shows a Linux native partition. Now that we have confirmed we are working with an LVM we can continue. For increasing the size of a Linux native partition (hex code 83) [see this article.](https://www.rootusers.com/use-gparted-to-increase-disk-size-of-a-linux-native-partition/) Below is the disk information showing that our initial setup only has the one 20gb disk currently, which is under the logical volume named /dev/mapper/Mega-root – this is what we will be expanding with the new disk. [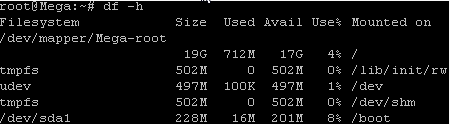](https://docs.thehomestack.io/uploads/images/gallery/2024-09/uWFimage.png) Note that /dev/mapper/Mega-root is the volume made up from /dev/sda5 currently – this is what we will be expanding. ## Adding a new virtual hard disk First off we add a new disk to the virtual machine. This is done by right clicking the virtual machine in vSphere, selecting edit settings and then clicking the “Add…” button which is used to add hardware to the virtual machine. Select hard disk and click next.At this point if you do not see the correct added space on /dev/sda4 you will need to reboot the server.
As you can see the new partition of 150gb is a 8e meaning a Linux file system which is correct, older version we needed to change this. ‘w’ is used to write the table to disk and exit, basically all the changes that have been done will be saved and then you will be exited from fdisk. ```shell Command (m for help): w The partition table has been altered. Syncing disks. ``` You will see a warning which basically means in order to use the new table with the changes a system reboot is required. If you can not see the new partition using “fdisk -l” you may be able to run “partprobe -s” to rescan the partitions. In my test I did not require either of those things at this stage (I do a reboot later on), straight after pressing ‘w’ in fdisk I was able to see the new /dev/sda3 partition of my 10gb of space as displayed in the below image. That’s all for partitioning, we now have a new partition which is making use of the previously unallocated disk space from the increase in VMware. ## Increasing the logical volume We use the pvcreate command which creates a physical volume for later use by the logical volume manager (LVM). In this case the physical volume will be our new /dev/sda4 partition. ```shell pvcreate /dev/sda4 ``` Physical volume "/dev/sda4" successfully created. Next we need to confirm the name of the current volume group using the vgdisplay command. The name will vary depending on your setup, for me it is the name of my test server. vgdisplay provides lots of information on the volume group, I have only shown the name and the current size of it for this example. ```bash vgdisplay ```| --- Volume group --- VG Name rl System ID Format lvm2 Metadata Areas 1 Metadata Sequence No 3 VG Access read/write VG Status resizable MAX LV 0 Cur LV 2 Open LV 2 Max PV 0 Cur PV 1 Act PV 1 VG Size 98.41 GiB PE Size 4.00 MiB Total PE 25193 Alloc PE / Size 25193 / 98.41 GiB Free PE / Size 0 / 0 VG UUID 16Qr51-iLg8-HDNB-MkUc-TB5c-dL9j-rnpHUE |
| PV /dev/sda3 VG rl lvm2 \[98.41 GiB / 0 free\] PV /dev/sda4 VG rl lvm2 \[<250.00 GiB / <250.00 GiB free\] Total: 2 \[<348.41 GiB\] / in use: 2 \[<348.41 GiB\] / in no VG: 0 \[0 \] |
| --- Logical volume --- LV Path /dev/rl/root LV Name root VG Name rl LV UUID mb2gT4-2oqM-8icq-B8S6-A3lZ-9Ivi-scDZqS LV Write Access read/write LV Creation host, time server01, 2022-10-08 19:34:32 -0400 LV Status available \# open 1 LV Size 94.45 GiB Current LE 24180 Segments 1 Allocation inherit Read ahead sectors auto - currently set to 8192 Block device 253:0 --- Logical volume --- LV Path /dev/rl/swap LV Name swap VG Name rl LV UUID NWNCL3-rzD7-av3v-lRP0-OQy9-4CcE-phna9T LV Write Access read/write LV Creation host, time server01, 2022-10-08 19:34:33 -0400 LV Status available \# open 2 LV Size <3.96 GiB Current LE 1013 Segments 1 Allocation inherit Read ahead sectors auto - currently set to 8192 Block device 253:1 |
| Size of logical volume rl/root changed from 94.45 GiB (24180 extents) to <344.45 GiB (88179 extents). Logical volume rl/root successfully resized |
| meta-data=/dev/mapper/rl-root isize=512 agcount=4, agsize=6190080 blks = sectsz=512 attr=2, projid32bit=1 = crc=1 finobt=1, sparse=1, rmapbt=0 = reflink=1 bigtime=0 inobtcount=0 data = bsize=4096 blocks=24760320, imaxpct=25 = sunit=0 swidth=0 blks naming =version 2 bsize=4096 ascii-ci=0, ftype=1 log =internal log bsize=4096 blocks=12090, version=2 = sectsz=512 sunit=0 blks, lazy-count=1 realtime =none extsz=4096 blocks=0, rtextents=0 data blocks changed from 24760320 to 90295296 |
| Filesystem Size Used Avail Use% Mounted on devtmpfs 1.8G 0 1.8G 0% /dev tmpfs 1.8G 0 1.8G 0% /dev/shm tmpfs 1.8G 8.7M 1.8G 1% /run tmpfs 1.8G 0 1.8G 0% /sys/fs/cgroup /dev/mapper/rl-root 345G 85G 260G 25% / /dev/sda2 1014M 319M 696M 32% /boot /dev/sda1 599M 5.8M 594M 1% /boot/efi tmpfs 367M 0 367M 0% /run/user/0 |
Last verified: October 2026 against the current lvreduce and resize2fs manual pages.
**Note:** This example was written on CentOS 7 (now end of life); the same LVM and ext4 commands apply on RHEL / Rocky Linux 8 and 9. The default file system on these releases is XFS, which cannot be shrunk with these steps, so this example is working with the ext4 file system. In this example we will work through shrinking logical volume /dev/centos/var from 10GB to 5GB. ## Overview of Logical Volume Manager (LVM) Before working through the resizing process it’s important you first understand some basic concepts around physical volumes, volume groups, logical volumes, and the file system. - **Physical Volume (PV):** This can be created on a whole physical disk (think /dev/sda) or a Linux partition. - **Volume Group (VG):** This is made up of at least one or more physical volumes. - **Logical Volume (LV):** This is sometimes referred to as the partition, it sits within a volume group and has a file system written to it. - **File System:** A file system such as ext4 will be on the logical volume. ## LVM Resize – How to decrease or shrink the logical volume To decrease the size of an LVM partition you must first decrease the file system within in order to avoid possible data corruption. As there is the potential for this to happen if you enter the command incorrectly, it is strongly recommended that you have a full backup of your data before proceeding. Shrinking a logical volume will give you more space in the volume group, meaning that you could instead [extend another logical volume](https://www.rootusers.com/lvm-resize-how-to-increase-an-lvm-partition) with this new found space. The first step will depend on if you’re looking to shrink a LVM root volume, or non-root volume. ### Shrinking a root volume The root volume would typically be the logical volume that is mounted to /. You cannot unmount this to shrink it as it’s in use by the running operating system meaning that you will have to first boot from a Live CD to complete this. Once booted into the Live CD, you may first need to run the below command to pick up LVM volumes, however this usually happens during boot so may not be required, if in doubt just run it. ```shell vgchange -a y ``` ### Shrinking a non-root volume Alternatively if the volume you are shrinking is a non-root volume, that is any other volume not mounted to the root of the file system, you can unmount the volume as shown below to proceed. Please note that when you unmount the volume the data will not be available, so you may need to schedule down time and stop running applications that use data from it prior to unmounting. Unmount by specifying either the logical volume or the location it’s currently mounted to, in the below example we specify the logical volume which can be found in /dev/(vg-name)/(lv-name). ```shell umount /dev/centos/var ``` **All following steps now apply to both a root or non-root volume.** Before being able to attempt to shrink the size of an LVM volume, you must first run a file system check on it. If you don’t do this, you will get an error message and will not be able to proceed. This is a required step as resizing a file system in a bad state could cause data corruption. The -f flag makes the check run even if the file system appears clean, while -y assumes yes to all questions and will respond if asked to fix a problem. ```shell e2fsck -fy /dev/centos/var ``` Next you need to shrink the file system, to be safe we’re going to shrink the file system lower than what the logical volume will shrink to. This is because we don’t want to accidentally shrink the logical volume to a size lower than the file system in the next step, as this can result in corruption and data loss. Don’t worry, we’ll reclaim the space at the end. The command below will shrink the file system so that it is only 4G in size total, note that what ever size you specify to shrink to you must have in free space within the file system otherwise you must first delete data. ```shell resize2fs /dev/centos/var 4G ``` Once the file system has been reduced, we can shrink the size of the logical volume with the lvreduce command. Reduce this to the size that you want the volume to be, as specified by the -L flag. Instead if you want to reduce by a specified size, simply put a - in front of the size. Both are shown below for completeness, however you only need to run one. To reduce to 5G ```shell lvreduce -L 5G /dev/centos/var ``` To reduce by 5G ```shell lvreduce -L -5G /dev/centos/var ```Alternative: `lvreduce -r` (`--resizefs`) resizes the file system together with the logical volume using fsadm, for example `lvreduce -r -L 5G /dev/centos/var`. The manual steps on this page give you more control.
Once you execute the lvreduce command you will get a warning advising the size you have chosen to reduce to so use this as a chance to confirm you’re shrinking the logical volume to a size that is NOT smaller than the size you previously shrunk the file system to. Once you have confirmed it’s fine to proceed enter ‘y’ and press enter. After the logical volume has been lowered to the required size, run resize2fs on the volume as this will extend the file system to use all available space within the logical volume. This makes use of all remaining free space so that none is wasted from when we previously shrunk the file system to a lower size than the logical volume. ```shell resize2fs /dev/centos/var ``` At this point all that’s left to do is mount the volume. If this was a root volume and you’re working within a Live CD, simply boot back into your primary Linux operating system. If this was a non-root volume and you unmounted it to complete the reduction, simply mount it back. You can do this with ‘mount -a’ assuming you have the configuration already set in /etc/fstab, otherwise specify the logical volume and where it should mount to. Here we’re manually mounting to /mnt just for testing. ```shell mount /dev/centos/var /mnt ``` After you’ve either booted back to primary operating system or completed the mount, check the space shown with the ‘df’ command to confirm it has been decreased as expected. ```shell [root@CentOS7 /]# df -h Filesystem Size Used Avail Use% Mounted on /dev/mapper/centos-root 9.8G 1.4G 8.5G 14% / devtmpfs 908M 0 908M 0% /dev tmpfs 914M 0 914M 0% /dev/shm tmpfs 914M 8.6M 905M 1% /run tmpfs 914M 0 914M 0% /sys/fs/cgroup /dev/sda1 497M 96M 402M 20% /boot /dev/mapper/centos-var 4.8G 20M 4.6G 1% /mnt ``` In this example /dev/centos/var is correctly showing as shrunk down from the original 10G. #### Sources - [https://man7.org/linux/man-pages/man8/lvreduce.8.html](https://man7.org/linux/man-pages/man8/lvreduce.8.html) - [https://man7.org/linux/man-pages/man8/resize2fs.8.html](https://man7.org/linux/man-pages/man8/resize2fs.8.html) - [https://www.rootusers.com/lvm-resize-how-to-decrease-an-lvm-partition/](https://www.rootusers.com/lvm-resize-how-to-decrease-an-lvm-partition/) # Linux - Re-Mapping Drives or Combining Drives The document is walk you through the re-mapping or combining of mapped drives on a Linux server. This is to make the root drive aka "/" drive one drive to be able to use the space of the full drive. First you will have to look at the current setup ```bash sudo fdisk -l ``` # RedHat - Install NFS Shares ### NFS Server Configuration #### Install NFS Utilities. ```bash sudo dnf install nfs-utils ``` #### Create the Shared Directory. ```bash sudo mkdir -p /nfs/exports/myshare ``` (Replace /nfs/exports/myshare with your desired path.) Configure NFS Exports: Edit the /etc/exports file to define the directories to be shared and the clients allowed to access them. ```bash sudo nano /etc/exports ``` Add a line similar to this, replacing client\_ip\_address with the actual IP address or hostname of your NFS client: ```bash /nfs/exports/myshare client_ip_address(rw,sync,no_root_squash) ``` **rw:** Read/write access. **sync:** Synchronous writes to disk. **no\_root\_squash:** Prevents root user on the client from being squashed to an anonymous user on the server. Use with caution. Apply Export Configuration. ```bash sudo exportfs -rav ``` Start and Enable NFS Services. ```bash sudo systemctl enable --now rpcbind nfs-server ``` Configure Firewall: Allow NFS traffic through the firewall. ```bash sudo firewall-cmd --permanent --add-service=nfs sudo firewall-cmd --permanent --add-service=mountd sudo firewall-cmd --permanent --add-service=rpc-bind sudo firewall-cmd --reload ``` # Bash - Add Symbolic Links SubdirectoriesLast verified: October 2026 against the GNU find manual (find(1)).
To efficiently add these symbolic links to all subdirectories that are missing them, you can use a `find` loop. This command will check each subdirectory and only create the link if a file or link named `.env` or `.secret` doesn't already exist. ### The Command Run this from the parent directory where your subdirectories are located: ```bash find . -maxdepth 1 -type d ! -path . -exec sh -c ' cd "$1" || exit [ ! -e .env ] && ln -s /mnt/volume1/docker/shared.env .env [ ! -e .secret ] && ln -s /mnt/volume1/docker/secret.env .secret ' _ {} \; ``` ### Breakdown of the Logic - **`find . -maxdepth 1 -type d ! -path .`**: This finds all directories exactly one level down from your current location, excluding the current directory (`.`) itself. - **`-exec sh -c '...' _ {} \;`**: This executes a small shell script for every directory found. `cd "$1" || exit` skips a directory that cannot be entered, so no links are created in the wrong place. - **`[ ! -e .env ]`**: This is a "logical gate." It checks if the file `.env` **does not** exist. If it's missing, it proceeds to the `&&` command to create the link. - **`ln -s [target] [link_name]`**: Creates the symbolic link. ### A Safer Alternative (Dry Run) If you want to see which directories will be affected before actually making changes, you can use this "echo" version: ```bash find . -maxdepth 1 -type d ! -path . -exec sh -c ' cd "$1" || exit [ ! -e .env ] && echo "Linking .env in $1" [ ! -e .secret ] && echo "Linking .secret in $1" ' _ {} \; ``` ### Quick Note on Relative vs. Absolute Paths Since you are using **absolute paths** for your targets (`/mnt/volume1/...`), these links will work regardless of which subdirectory they live in. If you ever move the `docker` folder, you'll need to update the links, but for a fixed mount point like yours, this is the most reliable method. ## Add Folder Exceptions To exclude specific subdirectories, you can use the `! -name` test (for simple folder names) or a regular expression with `! -regex` (for a longer list). Here are the two best ways to do it, depending on how many folders you need to skip. ### Option 1: Excluding by Folder Name (Simple) If you just want to skip a few specific folders by name (e.g., `backup` and `logs`), use this version. The `! -name "..."` tests tell `find` to ignore those specific directories. ```bash find . -maxdepth 1 -type d ! -path . ! -name "backup" ! -name "logs" -exec sh -c ' cd "$1" || exit [ ! -e .env ] && ln -s /mnt/volume1/docker/shared.env .env [ ! -e .secret ] && ln -s /mnt/volume1/docker/secret.env .secret ' _ {} \; ``` ### Option 2: Excluding a List (Cleanest for many folders) If you have a long list of exceptions, you can use a **regex** pattern. Replace `folder1|folder2|folder3` with the names of the directories you want to skip. `-regex` matches the whole path (for example `./folder1`), so the pattern starts with `.*/`, and `-regextype posix-extended` must come before it so that `|` and the parentheses work. ```bash find . -maxdepth 1 -type d ! -path . -regextype posix-extended ! -regex '.*/(folder1|folder2|folder3)' -exec sh -c ' cd "$1" || exit [ ! -e .env ] && ln -s /mnt/volume1/docker/shared.env .env [ ! -e .secret ] && ln -s /mnt/volume1/docker/secret.env .secret ' _ {} \; ``` ### Pro-Tip: The "Dry Run" I highly recommend running a "Dry Run" first to verify your exceptions are working correctly. This will print the folders it **would** have acted on without actually creating any links: ```bash find . -maxdepth 1 -type d ! -path . ! -name "exclude_me" -exec echo "Processing: {}" \; find . -maxdepth 1 -type d ! -path . -regextype posix-extended ! -regex '.*/(folder1|folder2|folder3)' -exec echo "Processing: {}" \; ``` ### Key Flags Used - **`! -name "folder"`**: Tells find: "Do NOT include items with this name." - **`! -regex '...'`**: Do NOT include items whose whole path matches the pattern (use with `-regextype posix-extended`). - **`! -path .`**: Prevents the command from trying to create links in the current parent directory (which would fail anyway since `.env` likely already exists there). - **`-maxdepth 1`**: Ensures the command only looks at the folders right in front of you, rather than digging into sub-sub-directories. #### Sources - [https://man7.org/linux/man-pages/man1/find.1.html](https://man7.org/linux/man-pages/man1/find.1.html) # Linux - How to use rCloneLast verified: October 2026 against the rclone documentation (current release v1.75.1); the filter and symlink behaviour was tested with rclone v1.75.1.
Here's how to get rclone doing what rsync was doing, but with real parallelism. ### 1. Install it ```bash sudo -v ; curl https://rclone.org/install.sh | sudo bash ``` or via a package manager (`dnf install rclone`, `apt install rclone`, `brew install rclone`, etc.). The rclone docs note that distribution packages are often out of date, so the install script or the official binaries are the better way to get the current version. ### 2. Configure a remote Rclone needs a "remote" config pointing at your server. For an SSH target the **SFTP backend** is the simple option: it works over your existing SSH setup, no extra service needed. ```bash rclone config ``` Walk through the prompts: - `n` for new remote - name it, e.g. `myserver` - type: `sftp` - host: `server.example.com` - user: `root` - port: 22 (default) - leave the rest default, use SSH agent or key auth if you have it set up Or skip the wizard and write it directly to `~/.config/rclone/rclone.conf`: ```ini [myserver] type = sftp host = server.example.com user = root ``` Or use the inline command to create the config file Run this single command (replace YOUR.SERVER.IP with the real IP or hostname): ```bash rclone config create myserver sftp host=YOUR.SERVER.IP user=root pass=$(rclone obscure 'YOUR_PASSWORD') ``` After it finishes, test the connection (`lsd` lists only the top-level directories; `ls` would list every file on the server recursively): ```bash rclone lsd myserver:/ ``` ### 3. Run the sync ```bash rclone sync /path/to/source/ myserver:/path/to/dest/ \ --progress \ --transfers=32 \ --checkers=32 ``` Key flags, and why: - **`sync`** — makes the destination match the source, including **deleting** extra files on the destination (like `rsync -a --delete`). Use `copy` instead if you don't want deletions, and try `--dry-run` first. - **`--transfers=32`** — number of files transferred in parallel. This is the big one for many-small-files workloads; rsync can't do this natively. Tune based on file count/CPU — 16–64 is a common range. - **`--checkers=32`** — parallel workers for comparing file existence/size/hash before transfer. - **`--progress`** — live stats, like rsync's `-P`. ### 4. Useful additions ```bash rclone sync /path/to/source/ myserver:/path/to/dest/ \ --progress \ --transfers=32 \ --checkers=32 \ --stats=5s \ --stats-one-line \ --exclude ".git/**" \ --dry-run ``` - `--dry-run` — test first, see what would change without touching anything - `--stats=5s --stats-one-line` — periodic compact progress instead of a wall of text - `--exclude` — same idea as rsync's exclude patterns - `--checksum` — only if you need content-based comparison instead of size+mtime (same cost tradeoff as rsync's `-c`) Pulling a Synology share to a local disk, with settings for a LAN and for a WAN link. To skip Synology's system folders (such as `@eaDir` and `#recycle`), exclude the folder *and its contents* with `/**`; a bare `--exclude "#recycle"` only matches a file with that name, so the folder's contents would still be copied. ```bash #LAN rclone sync myserver:/mnt/volume1/data_syno /mnt/volume1/data/ \ --exclude "@*" \ --exclude "@*/**" \ --exclude "#recycle/**" \ --multi-thread-streams=16 \ --buffer-size=128M \ --transfers=16 \ --progress \ --checkers=32 \ --sftp-concurrency=128 \ --log-level=INFO \ --stats=10s ``` ```bash #WAN rclone sync myserver:/mnt/volume1/data_syno /mnt/volume1/data/ \ --exclude "@*" \ --exclude "@*/**" \ --exclude "#recycle/**" \ --multi-thread-streams=4 \ --buffer-size=64M \ --transfers=8 \ --progress \ --checkers=16 \ --sftp-concurrency=64 \ --bwlimit=20M \ --log-level=INFO \ --stats=30s ``` Each continued line must end with a backslash `\`. `--fast-list` is left out because the SFTP backend does not support the ListR feature it relies on, so it has no effect there. `--sftp-concurrency=64` is already the default. ### 5. If SFTP itself is the bottleneck SFTP-over-SSH still has per-file protocol overhead. For raw speed on a trusted LAN, rclone also supports: - **`type = local`** on both ends if you mount the remote filesystem (NFS/etc.) — no protocol overhead at all - Running an `rclone serve` daemon on the destination for a lighter native protocol But for your use case (SSH between two Linux boxes), the SFTP backend with high `--transfers` is usually the easy win — try it and compare wall-clock time against your rsync run. ### Multiple excludes Repeat the `--exclude` flag once per pattern: ```bash rclone sync /path/to/source/ myserver:/path/to/dest/ \ --progress \ --transfers=32 \ --checkers=32 \ --exclude "Revision/**" \ --exclude "ftpDataSite/**" \ --exclude "Backups/**" ``` The `/**` matches the folder and everything under it, anywhere in the tree. If these folders only live at the top level (not nested elsewhere), you can anchor them: ```bash --exclude "/Revision/**" --exclude "/ftpDataSite/**" --exclude "/Backups/**" ``` (leading `/` means "relative to the sync root only") If the list grows, it's cleaner to use a file instead of repeated flags: ```bash # excludes.txt Revision/** ftpDataSite/** Backups/** ``` ```bash rclone sync /path/to/source/ myserver:/path/to/dest/ \ --progress --transfers=32 --checkers=32 \ --exclude-from excludes.txt ``` You can test what's actually getting matched with: ```bash rclone sync ... --exclude-from excludes.txt --dry-run -vv ``` ### Symlinks This is the part worth being careful about — rclone's symlink behaviour differs from rsync's. By default, rclone **does not copy symlinks**: it skips them and logs a notice for each one ("Can't follow symlink without -L/--copy-links"). Your options: **Follow symlinks and copy the actual file/directory contents** (like rsync's `-L`): ```bash --copy-links ``` Use this if you want the symlink target's real content transferred instead of a symlink pointer — e.g., if the destination server can't resolve the same symlink targets your source can. **Store symlinks as .rclonelink files** (`-l` / `--links`): ```bash --links ``` With an SFTP destination this does **not** create real symlinks. Each link is stored as a small text file named `Last verified: October 2026 for RHEL / Rocky Linux 9 against the Red Hat Samba guide, the smb.conf manual and Microsoft's SMB guest access documentation.
### Step 1: Install Samba on Linux To get started out with **Samba**, install the **Samba** core packages including the client package: ``` dnf install -y samba samba-common samba-client ``` Install-Samba in LinuxDo not add `ntlm auth = true` (older guides include it). It is an alias for `ntlmv1-permitted` and re-enables insecure NTLMv1. The default, `ntlmv2-only`, works with all modern clients.
To verify the configurations made, run the command: ``` testparm ``` Verify Samba Configuration [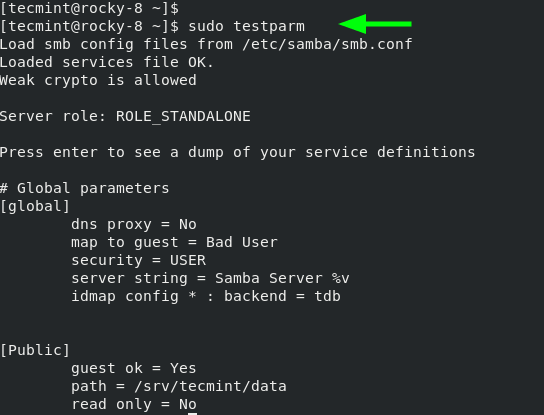](https://docs.thehomestack.io/uploads/images/gallery/2024-09/VO4image.png)Current Windows versions block guest (no password) access to SMB shares by default: Windows 10 1709+ and Windows Server 2019+ disable insecure guest logons, and Windows 11 24H2 / Windows Server 2025 also require SMB signing, which guest sessions cannot do. If the **Public** share will not open, use the authenticated share from Step 4 rather than weakening the client security settings.
In the textfield provided, enter the samba server’s IP address as shown: ``` \\server-ip ``` Access Samba Share from Windows [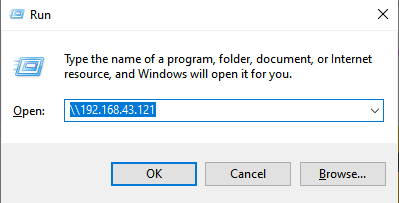](https://docs.thehomestack.io/uploads/images/gallery/2024-09/LWdimage.png)**Security warning:** older versions of this page shared `/` (the whole file system) writable to guests with `force user = root`. That gives **anyone who can reach the server full root write access** to every file on it, with no password. Samba's smb.conf manual notes that whatever privileges the guest account has are available to any client connecting to a guest share, and `force user = root` makes that account root. A guest-only setup like this is only for an isolated lab network and must **never** be exposed to an untrusted network or the internet. The `[httpd]` and `[html]` shares below also let guests write to the web server configuration and content. This page now shares a dedicated folder as the unprivileged guest account instead.
### Step 1: Install Samba on Linux To get started out with **Samba**, install the **Samba** core packages including the client package: ```bash dnf install -y samba samba-common samba-client ``` The command installs the packages specified along with the dependencies as displayed on the output. After the installation is complete, you will get a summary of all the packages that have been installed. Samba Installation Completes ### Step 2: Create and Configure Samba Shares Once all the **samba** packages have been installed, the next step is to configure the **samba shares**. A samba share is simply a directory that is going to be shared across client systems in the network. Next, we are going to make some configurations in the **smb.conf** configuration file which is Samba’s main configuration file. But before we do so, we will back up the file by renaming it with a different file extension. ```bash mv /etc/samba/smb.conf /etc/samba/smb.conf.bak ``` Next, we are going to create a new configuration file. ```bash vim /etc/samba/smb.conf ``` This will define the samba share by adding the lines shown in the configuration file. ```bash [global] unix charset = UTF-8 hosts allow = 192.168.x. map to guest = Bad User log file = /var/log/samba/log.%m log level = 1 server role = standalone server [httpd] path = /etc/httpd/ read only = no guest ok = yes guest only = yes force user = apache force group = apache [html] path = /var/www/html/ read only = no guest ok = yes guest only = yes force user = apache force group = apache [public] # Guest-only share: no password, guests run as the guest account (default: nobody) path = /srv/samba/public read only = no guest ok = yes guest only = yes ``` Save and exit the configuration file. Create the dedicated public folder, make it owned by the guest account (`nobody`) so guests can write to it, and give it the Samba SELinux label: ```bash mkdir -p /srv/samba/public chown -R nobody:nobody /srv/samba/public chmod 0755 /srv/samba/public semanage fcontext -a -t samba_share_t "/srv/samba/public(/.*)?" restorecon -Rv /srv/samba/public ``` There is no `force user` line on this share: with `guest only = yes` every connection already runs as the `guest account` (default `nobody`), so guests can only write where `nobody` can. Never set `force user = root` on a guest share. If semanage is missing, install `policycoreutils-python-utils`. To verify the configurations made, run the command: ```bash testparm ``` This verifies Samba Configuration Next, start and enable Samba daemons as shown. ``` systemctl enable --now smb;systemctl enable --now nmb ``` Be sure to confirm that both the **smb** and **nmb** daemons are running. ``` systemctl status smb;systemctl status nmb ``` This verified Samba Status ### Step 3: Accessing Samba Share from Windows Thus far, we have installed **samba** and configured our **samba share**. We are now ready to access it remotely. To do this on a Windows client, press the Windows logo key + R to launch the **Run** dialog. In the textfield provided, enter the samba server’s IP address as shown: ``` \\server-ip ``` This accesses Samba Share from Windows Some data from here [https://wiki.samba.org/index.php/Setting\_up\_Samba\_as\_a\_Standalone\_Server](https://wiki.samba.org/index.php/Setting_up_Samba_as_a_Standalone_Server) #### Sources - [https://wiki.samba.org/index.php/Setting\_up\_Samba\_as\_a\_Standalone\_Server](https://wiki.samba.org/index.php/Setting_up_Samba_as_a_Standalone_Server) - [https://www.samba.org/samba/docs/current/man-html/smb.conf.5.html](https://www.samba.org/samba/docs/current/man-html/smb.conf.5.html) - [https://docs.redhat.com/en/documentation/red\_hat\_enterprise\_linux/9/html/configuring\_and\_using\_network\_file\_services/assembly\_using-samba-as-a-server\_configuring-and-using-network-file-services](https://docs.redhat.com/en/documentation/red_hat_enterprise_linux/9/html/configuring_and_using_network_file_services/assembly_using-samba-as-a-server_configuring-and-using-network-file-services) # Mail, Web & Logging Mail relays, web server helpers and log management. # Linux - Setup RedHat 10 SMTP Server**Security warning:** this guide is written for a lab or internal relay. It disables SELinux and the firewall, allows plaintext authentication (`disable_plaintext_auth = no`, `auth_mechanisms = plain login`) and sets the Dovecot auth socket to `mode = 0666` (any local user can use it). For anything internet-facing: keep SELinux enforcing, keep firewalld running and open only the mail ports you need, require TLS before authentication (for example Postfix [smtpd\_tls\_auth\_only = yes](https://www.postfix.org/postconf.5.html#smtpd_tls_auth_only)), and restrict the auth socket to Postfix (`mode = 0660`, `user = postfix`, `group = postfix`, as in the [Postfix SASL README](https://www.postfix.org/SASL_README.html)).
## System Configuration ### Upgrade Current System ```shell subscription-manager repos --enable codeready-builder-for-rhel-10-$(arch)-rpms dnf install https://dl.fedoraproject.org/pub/epel/epel-release-latest-10.noarch.rpm -y dnf upgrade -y ``` ### Configure SELinux ```shell setenforce 0 sed -i 's/^SELINUX=.*/SELINUX=disabled/g' /etc/selinux/config ``` ### Disable Firewall ```shell systemctl disable firewalld.service ``` ### Install Core Tools ```shell dnf install bind-utils bzip2 cups cifs-utils enscript ftp gdb ghostscript krb5-workstation ksh lftp lrzsz lsof libnsl lzop mariadb-server plocate mutt ncompress net-tools net-snmp net-snmp-utils net-tools nfs-utils nmap nvme-cli openldap-clients openssh-clients psmisc realmd rsync samba-client strace sysstat tcpdump telnet telnet-server tmux unix2dos vim vim-enhanced vsftpd wget xfsdump vsftpd htop mc rsyslog rsyslog-doc postfix dbus-daemon s-nail dovecot cyrus-sasl cyrus-sasl-lib cyrus-sasl-plain tree -y ``` Extras not included in EPEL to get the java version for Kiwi ```bash cat <| \#server \_gateway iburst **server ntp.example.com iburst** \# Use public servers from the pool.ntp.org project. \# Please consider joining the pool (https://www.pool.ntp.org/join.html). |
**Security warning:** this guide is written for a lab or internal relay. It disables SELinux and the firewall, allows plaintext authentication (`disable_plaintext_auth = no`, `auth_mechanisms = plain login`) and sets the Dovecot auth socket to `mode = 0666` (any local user can use it). For anything internet-facing: keep SELinux enforcing, keep firewalld running and open only the mail ports you need, require TLS before authentication (for example Postfix [smtpd\_tls\_auth\_only = yes](https://www.postfix.org/postconf.5.html#smtpd_tls_auth_only)), and restrict the auth socket to Postfix (`mode = 0660`, `user = postfix`, `group = postfix`, as in the [Postfix SASL README](https://www.postfix.org/SASL_README.html)).
## System Configuration ### Upgrade Current System ```shell dnf install epel-release -y dnf upgrade -y ``` ### Configure SELinux ```shell setenforce 0 sed -i 's/^SELINUX=.*/SELINUX=disabled/g' /etc/selinux/config ``` ### Disable Firewall ```shell systemctl disable firewalld.service ``` ### Install Core Tools ```shell dnf install bind-utils bzip2 cups cifs-utils enscript ftp gdb ghostscript java-1.8.0-openjdk-headless java-11-openjdk-headless krb5-workstation ksh lftp lrzsz lsof libnsl lzop mariadb-server mlocate mutt ncompress net-tools net-snmp net-snmp-utils net-tools nfs-utils nmap nvme-cli openldap-clients openssh-clients psmisc realmd rsync samba-client strace sysstat tcpdump telnet telnet-server tmux unix2dos vim vim-enhanced vsftpd wget xfsdump vsftpd htop mc rsyslog rsyslog-doc postfix dbus-daemon s-nail dovecot cyrus-sasl cyrus-sasl-lib cyrus-sasl-plain -y ``` ### Configure Virtual Tool ```shell dnf install open-vm-tools -y sysctl vm.swappiness=10 ``` ### Time Sync ```shell systemctl enable --now chronyd ``` ## Configure Postfix ### Postfix Settings We now have to configure Postfix. One thing to keep in mind is that we're configuring Postfix to only send email, not receive it (as that is a far more complicated topic that requires considerable setup time and understanding to prevent the server from becoming an open relay, which could lead to a serious spam issue). Because of this, we can skip setting up Postfix to listen and instead go right to the hostname. The Postfix hostname must be set to match the system hostname. We'll use the [mail.example.com](http://mail.example.com) address (so make sure to change this to match your hostname). Set that hostname with the command: ```shell sudo postconf -e "myhostname = mail.yourdomain.com" ``` Make sure to check that the apex domain (aka root domain) is correct with the command: ```shell postconf mydomain ``` The apex domain for our example should be listed as [http://example.com](http://example.com) . If not, set it with: ```shell sudo postconf -e "mydomain = example.com" ``` Set the myorigin parameter with: ```shell sudo postconf -e "myorigin = $mydomain" ``` Set to allow all IP to access the server with: ```shell sudo postconf -e "inet_interfaces = all" ``` Set to only allow IPv4 to use this server with: ```shell sudo postconf -e "inet_protocols = ipv4" ``` Set the mydestination parameter with: ```shell sudo postconf -e "mydestination = $myhostname, localhost.$mydomain, localhost, $mydomain" ``` Set the allowed IP address to relay on this server with: ```shell sudo postconf -e "mynetworks = 127.0.0.0/8, 10.0.0.0/24, 192.168.0.0/16" ``` Set the mail folder with: ```shell sudo postconf -e "home_mailbox = Maildir/" ``` Set the banner with: ```shell sudo postconf -e "smtpd_banner = $myhostname ESMTP" ``` Set to disable verify with: ```shell sudo postconf -e "disable_vrfy_command = yes" ``` Set to require the HELO for senders with: ```shell sudo postconf -e "smtpd_helo_required = yes" ``` Set the message limit for example 10MB with: ```shell sudo postconf -e "message_size_limit = 10240000" ``` Set SMTP Authentication with: ```shell sudo postconf -e "smtpd_sasl_type = dovecot" sudo postconf -e "smtpd_sasl_path = private/auth" sudo postconf -e "smtpd_sasl_auth_enable = yes" sudo postconf -e "smtpd_sasl_security_options = noanonymous" sudo postconf -e "smtpd_sasl_local_domain = $myhostname" sudo postconf -e "smtpd_recipient_restrictions = permit_mynetworks, permit_auth_destination, permit_sasl_authenticated, reject" ``` With these taken care of, restart Postfix with: ```shell sudo systemctl restart postfix ``` ### Extra Authentications Configure additional settings for Postfix if you need. It's possible to reject many spam emails with the settings below. However, you should consider to apply the settings, because sometimes normal emails are also rejected with them. Especially, there are SMTP servers that forward lookup and reverse lookup of their hostnames on DNS do not match even if they are not spammers. ```shell sudo postconf -e "smtpd_client_restrictions = permit_mynetworks, reject_unknown_client_hostname, permit" sudo postconf -e "smtpd_sender_restrictions = permit_mynetworks, reject_unknown_sender_domain,reject_non_fqdn_sender" sudo postconf -e "smtpd_helo_restrictions = permit_mynetworks, reject_unknown_hostname,reject_non_fqdn_hostname, reject_invalid_hostname, permit" ``` ### Enable Postfix ```shell sudo systemctl enable --now postfix ``` ## Configure Dovecot ### Dovecot Settings This example shows to configure to provide SASL function to Postfix. vi /etc/dovecot/dovecot.conf and uncomment and if not use IPv6, remove \[::\] ```shell listen = *, :: ``` vi /etc/dovecot/conf.d/10-auth.conf and uncomment and change for the case you allow plain text auth ```shell disable_plaintext_auth = no ``` and then add login to ```shell auth_mechanisms = plain login ``` vi /etc/dovecot/conf.d/10-mail.conf and uncomment and add ```shell mail_location = maildir:~/Maildir ``` vi /etc/dovecot/conf.d/10-master.conf and uncomment and add like follows Postfix smtp-auth ```shell unix_listener /var/spool/postfix/private/auth { mode = 0666 user = postfix group = postfix } ``` vi /etc/dovecot/conf.d/10-ssl.conf and change to use SSL if available but not require SSL ```shell ssl = yes ``` ### Enable Dovecot ```shell sudo systemctl enable --now dovecot ``` ## Test the setup Now that everything is set up, test Postfix by sending an email from the command line like so: ```shell echo "Rocky Linux Rocks" | sendmail EMAIL ``` Where EMAIL is a valid email address. If you receive the email, congratulate yourself on a job well done. If the email fails to arrive, you might need to verify if your DNS records are correct and the changes have taken effect (they can take up to 24 hours). You can also check the maillog with a command like: ```shell tail -f /var/log/maillog ``` With the tail running, open another terminal window and attempt to send another email to see what kind of logs are written. From that information, you can start troubleshooting any issues that are causing problems. Used ref from [https://www.server-world.info/en/note?os=Rocky\_Linux\_8&p=mail&f=1](https://www.server-world.info/en/note?os=Rocky_Linux_8&p=mail&f=1) [https://www.server-world.info/en/note?os=Rocky\_Linux\_8&p=mail&f=2](https://www.server-world.info/en/note?os=Rocky_Linux_8&p=mail&f=2) # Linux - Setting up a Logging ServerLast verified: October 2026 against the RHEL 9 remote logging guide and the current rsyslog documentation.
## Summary This is to setup a logging server to capture logs from any servers on your network. ### Prerequisites Install of a RedHat or Rocky Linux minimal install (RHEL 9 / Rocky Linux 9 or later) ### Configuration You will need to edit the file "/etc/rsyslog.conf" #### Editing the file ```bash vi /etc/rsyslog.conf ``` You will need to change to the following to allow port 514 to be open ```bash # Provides UDP syslog reception # for parameters see http://www.rsyslog.com/doc/imudp.html module(load="imudp") # needs to be done just once input(type="imudp" port="514") # Provides TCP syslog reception # for parameters see http://www.rsyslog.com/doc/imtcp.html module(load="imtcp") # needs to be done just once input(type="imtcp" port="514") ``` Open port 514 in the firewall (skip if firewalld is disabled), check the configuration and then restart the rsyslog daemon ```bash firewall-cmd --permanent --add-port=514/tcp firewall-cmd --permanent --add-port=514/udp firewall-cmd --reload rsyslogd -N1 systemctl restart rsyslog ``` Port 514 is already labelled `syslogd_port_t` in the default SELinux policy. If you use a different port, add it with `semanage port -a -t syslogd_port_t -p tcpOlder guides use `& ~` here. The `~` discard action is deprecated and logs a warning on current rsyslog; use `& stop` instead.
#### Setup Log Rotate Create a log file configuration file ```bash vi /etc/logrotate.d/remote-hosts ``` then add the following, and change the folder name pattern(s) to match your host names. Each line must match the log files inside the per-host folders. ```bash /var/log/server*/*.log /var/log/web*/*.log /var/log/vcenter*/*.log { rotate 2 maxsize 200k daily } ``` Run to make sure the config is good ```bash logrotate -d /etc/logrotate.d/remote-hosts ``` #### Setup Host Servers This is what to setup on the servers you wish to log to one server You must login to the server and then edit the following file ```bash vi /etc/rsyslog.conf ``` Once opened, add one of the following lines at the end of the file to send everything (use only one, TCP is recommended). Replace 192.168.x.x with your logging server's IP or hostname, then run `systemctl restart rsyslog`. ```bash *.* @192.168.x.x:514 # use @ for UDP protocol *.* @@192.168.x.x:514 # use @@ for TCP protocol ``` You can also setup specific logging by doing the following ```bash auth.* @@192.168.x.x:514 # only for authentication based records ``` #### Results This is what your folder will look like with the host name of the server or device ```bash drwx------ 2 root root 42 Aug 29 22:30 router01 drwx------ 2 root root 82 Aug 29 22:32 server01 drwx------ 2 root root 87 Aug 29 22:32 web01 ``` This is a look within a folder of a server ```bash [/var/log]# cd server01/ root@server01.example.com : Linux : Thu Aug 29 22:35:01 : [/var/log/server01]# ls -lrt total 16 -rw------- 1 root root 850 Aug 29 22:30 rsyslogd.log -rw------- 1 root root 56 Aug 29 22:32 sssd_kcm.log -rw------- 1 root root 948 Aug 29 22:32 systemd.log -rw------- 1 root root 251 Aug 29 22:32 CROND.log ``` #### Sources - [https://docs.redhat.com/en/documentation/red\_hat\_enterprise\_linux/9/html/security\_hardening/assembly\_configuring-a-remote-logging-solution\_security-hardening](https://docs.redhat.com/en/documentation/red_hat_enterprise_linux/9/html/security_hardening/assembly_configuring-a-remote-logging-solution_security-hardening) - [https://docs.rsyslog.com/doc/configuration/actions.html](https://docs.rsyslog.com/doc/configuration/actions.html) - [https://docs.rsyslog.com/doc/configuration/converting\_to\_new\_format.html](https://docs.rsyslog.com/doc/configuration/converting_to_new_format.html) - [https://docs.rsyslog.com/doc/faq/common-config-mistakes.html](https://docs.rsyslog.com/doc/faq/common-config-mistakes.html) # Virtualization & Containers KVM virtualization, Kubernetes and container tooling. # Linux - Install KVMLast verified: October 2026 for RHEL 9 against the Red Hat virtualization, networking and web console guides.
#### Prerequisites - RHEL 9 installed (minimal or with a desktop; the web console used in step 5 does not need a desktop) - Sudo user with admin rights - Local repository or Red Hat subscription - Internet connectivity (for Red Hat subscription) - Minimum host resources from Red Hat: 6 GB free disk plus 6 GB per VM, 2 GB RAM plus 2 GB per VM, and 4 CPUs Once the prerequisites are met then jump into installation steps of KVM. ### 1) Check Whether Virtualization is Enabled or not To get off the ground, you need to verify if your system supports Virtualization. This is usually enabled in the BIOS/UEFI. To verify, run one of the following commands; any output means the CPU flag is present. For Intel CPUs ```bash grep -e 'vmx' /proc/cpuinfo ``` For AMD CPUs ```bash grep -e 'svm' /proc/cpuinfo ``` Alternatively, you can run the following command. VT-x is Intel’s virtualization technology and AMD-V is AMD’s. ```bash lscpu | grep Virtualization ``` Also, you might want to check if KVM modules are loaded. ```bash lsmod | grep kvm ``` ### 2) Install Virtualization Packages First refresh the repositories, install all available updates and reboot once. ```bash sudo dnf update -y sudo reboot ``` Next, install the virtualization packages listed in the Red Hat guide. ```bash sudo dnf install qemu-kvm libvirt virt-install virt-viewer ``` **virt-install** is a command-line tool for creating virtual machines. **virt-viewer** is a lightweight UI that lets you interact with a VM using the VNC or SPICE protocol. Optionally, install additional virtualization tools. ```bash sudo dnf install -y virt-top guestfs-tools ``` ### 3) Start the Virtualization Services RHEL 9 uses modular libvirt daemons (virtqemud, virtnetworkd and so on) instead of the old monolithic libvirtd, which is deprecated. Start their sockets as shown in the Red Hat guide: ```bash for drv in qemu network nodedev nwfilter secret storage interface; do sudo systemctl start virt${drv}d{,-ro,-admin}.socket; done ``` Then verify that the host is ready for virtualization. If all checks return PASS, you can create VMs. ```bash sudo virt-host-validate ``` ### 4) Configure Network Bridge for KVM If you want to access your KVM virtual machines from outside the KVM hypervisor, configure a network bridge (kvmbr0) and attach the physical interface to it. **Note:** The virtual bridge `virbr0` is created automatically by libvirt. VMs on it get a NATed address, so it is mainly useful for testing. To create the bridge kvmbr0 on RHEL 9.4 or later, run the following commands. Run them from the local console rather than over SSH on the same interface, because the existing connection on that interface is removed and the network drops until the bridge comes up. ```bash nmcli connection show sudo nmcli connection add type bridge con-name kvmbr0 ifname kvmbr0 sudo nmcli connection modify kvmbr0 ipv4.addresses '192.168.1.179/24' ipv4.gateway '192.168.1.1' ipv4.dns '192.168.1.1' ipv4.method manual sudo nmcli connection delete enp0s3 sudo nmcli connection add type ethernet port-type bridge con-name kvmbr0-port1 ifname enp0s3 controller kvmbr0 sudo nmcli connection up kvmbr0 ``` **Note:** Replace the interface name and IP address details as per your setup. Releases before RHEL 9.4 use `slave-type` and `master` instead of `port-type` and `controller`. Check the bridge status and its ports with the ip command. ```bash ip addr show kvmbr0 ip link show master kvmbr0 ``` ### 5) Create a Virtual Machine using the Web Console On RHEL 9 the Virtual Machine Manager (virt-manager) GUI is deprecated; Red Hat recommends the RHEL web console (Cockpit) for managing VMs graphically. Install and enable the web console and its virtual machines plug-in: ```bash sudo dnf install cockpit cockpit-machines sudo systemctl enable --now cockpit.socket sudo firewall-cmd --add-service=cockpit --permanent sudo firewall-cmd --reload ``` Open `https://Last verified: October 2026 against the official Kubernetes, containerd, Docker, Calico and EPEL documentation (see **Sources** at the bottom). Versions used in this guide: Kubernetes **v1.37** (latest patch v1.37.1; supported minors are 1.37, 1.36 and 1.35), containerd **2.x** from Docker's `containerd.io` package, Calico **v3.33.0**, RHEL **9.8** / Rocky Linux **9.8**.
Original third-party references (these may be out of date; the official sources are listed at the bottom of the page): - [https://infotechys.com/install-a-kubernetes-cluster-on-rhel-9](https://infotechys.com/install-a-kubernetes-cluster-on-rhel-9) - [https://www.youtube.com/watch?v=\_ELvCuXO6y4](https://www.youtube.com/watch?v=_ELvCuXO6y4) - [https://medium.com/weeklycloud/kubernetes-installation-on-rhel-9-d5629f2fa4f9](https://medium.com/weeklycloud/kubernetes-installation-on-rhel-9-d5629f2fa4f9) - [https://www.youtube.com/watch?v=vX2n05t0AQg&t=1782s](https://www.youtube.com/watch?v=vX2n05t0AQg&t=1782s) ### Prerequisites On **each node** (control plane and workers), as root: - RHEL 9.x or Rocky Linux 9.x (9.8 is the current minor release of both). - At least 2 GB of RAM per machine and 2 or more CPUs on control plane machines. - Full network connectivity between all machines in the cluster. - A unique hostname, MAC address and `product_uuid` on every node (watch out for cloned VMs). Check with `ip link` and `cat /sys/class/dmi/id/product_uuid`. #### Update the System You can choose to disable the firewall, or keep it and open the required ports. SELinux is set to **permissive** in both cases. Set SELinux to permissive (this is the method in the official kubeadm guide, so it applies to both options): ```bash setenforce 0 sed -i 's/^SELINUX=enforcing$/SELINUX=permissive/' /etc/selinux/config ``` Permissive mode effectively disables SELinux enforcement. Kubernetes requires this so containers can access the host filesystem, which some network plugins need. You can leave SELinux enforcing only if you know how to configure it yourself; kubeadm does not support that setup.Option A: disable the firewall
```bash systemctl disable --now firewalld.service ``` Calico's system requirements recommend disabling firewalld (or any other iptables manager) because it can interfere with the rules Calico adds.Option B: keep firewalld and open the required ports
For Kubernetes components to communicate across nodes, open these ports. The Kubernetes ports come from the official *Ports and Protocols* reference. The Calico ports come from Calico's system requirements; the default Calico install in this guide uses BGP plus VXLAN. - **6443/tcp**: Kubernetes API server - **2379-2380/tcp**: etcd server client API - **10250/tcp**: kubelet API - **10257/tcp**: kube-controller-manager - **10259/tcp**: kube-scheduler - **179/tcp**: Calico BGP - **5473/tcp**: Calico Typha (operator installs always deploy Typha) - **4789/udp**: Calico VXLAN Commands to open ports on the **Control Plane Node**: ```bash firewall-cmd --permanent --add-port={6443,2379-2380,10250,10257,10259,179,5473}/tcp firewall-cmd --permanent --add-port=4789/udp firewall-cmd --reload ``` These ports handle node-to-node communication and pod access on the workers: - **10250/tcp**: kubelet API - **10256/tcp**: kube-proxy - **30000-32767/tcp and udp**: NodePort Services - **179/tcp**: Calico BGP - **5473/tcp**: Calico Typha (operator installs always deploy Typha) - **4789/udp**: Calico VXLAN Commands to open ports on **Worker Nodes**: ```bash firewall-cmd --permanent --add-port={10250,10256,30000-32767,179,5473}/tcp firewall-cmd --permanent --add-port={30000-32767,4789}/udp firewall-cmd --reload ```End of firewall options
Stop NetworkManager from managing Calico's interfaces. Calico's troubleshooting guide says to do this before you install Calico. Run this on every node; the reboot in Step 4 applies it. ```bash cat > /etc/NetworkManager/conf.d/calico.conf << EOF [keyfile] unmanaged-devices=interface-name:cali*;interface-name:tunl*;interface-name:vxlan.calico;interface-name:vxlan-v6.calico;interface-name:wireguard.cali;interface-name:wg-v6.cali EOF ``` EPEL Release (optional; Kubernetes itself does not need EPEL) RHEL 9: ```bash subscription-manager repos --enable codeready-builder-for-rhel-9-$(arch)-rpms dnf install https://dl.fedoraproject.org/pub/epel/epel-release-latest-9.noarch.rpm ``` Rocky Linux 9: ```bash dnf config-manager --set-enabled crb dnf install https://dl.fedoraproject.org/pub/epel/epel-release-latest-9.noarch.rpm ``` After installing EPEL, rerun the upgrade to apply any available updates: ```bash dnf upgrade -y ``` If you are running on a VMware virtual machine, run the following: ```bash dnf install open-vm-tools -y ``` Install vim colors for scripting (optional): ```bash dnf install git -y git clone https://github.com/flazz/vim-colorschemes ~/.vim/ cp ~/.vim/colors/desert.vim /etc/vimrc.local ``` ### Step 1: Add Kernel Modules Load the kernel modules used by the container runtime and pod networking (**on each node**): ```bash modprobe br_netfilter modprobe overlay ``` Next, create a configuration file (**as the root user on each node**) so these modules load at boot: ```bash cat > /etc/modules-load.d/k8s.conf << EOF br_netfilter overlay EOF ``` ### Step 2: Configure Sysctl Set the kernel parameters that Kubernetes networking relies on (**on each node**): ```bash cat > /etc/sysctl.d/k8s.conf << EOF net.ipv4.ip_forward = 1 net.bridge.bridge-nf-call-ip6tables = 1 net.bridge.bridge-nf-call-iptables = 1 EOF ``` These commands adjust the following kernel parameters:| Kernel Parameter | Description |
|---|---|
| **net.ipv4.ip\_forward** | Enables IPv4 packet forwarding. This is the only sysctl the official Kubernetes container runtime guide requires. |
| **net.bridge.bridge-nf-call-iptables** | Enables iptables to process bridged IPv4 traffic. Not required by the official guide, but some network plugins expect it. Needs the `br_netfilter` module. |
| **net.bridge.bridge-nf-call-ip6tables** | Enables ip6tables to process bridged IPv6 traffic. Not required by the official guide, but some network plugins expect it. Needs the `br_netfilter` module. |
Add the Docker CE Repository
The `containerd.io` package comes from Docker's RHEL repository. First remove any conflicting packages; Docker's install guide lists these, and `dnf` may report that none are installed. Then add the repository: ```bash dnf remove docker docker-client docker-client-latest docker-common docker-latest docker-latest-logrotate docker-logrotate docker-engine podman runc dnf -y install dnf-plugins-core dnf config-manager --add-repo https://download.docker.com/linux/rhel/docker-ce.repo ``` Update the package cache, then install the `containerd.io` package. As of October 2026 it installs containerd 2.3.x. ```bash dnf makecache dnf -y install containerd.io ``` If prompted to accept the GPG key, verify that the fingerprint is `060A 61C5 1B55 8A7F 742B 77AA C52F EB6B 621E 9F35`.Configure Containerd
The `/etc/containerd/config.toml` shipped with the package contains `disabled_plugins = ["cri"]`, which disables the CRI plugin that Kubernetes needs. Replace it with the full default configuration: ```bash containerd config default > /etc/containerd/config.toml ``` Next, set the `SystemdCgroup` option to `true`. The kubelet and the container runtime must use the same cgroup driver. The official docs recommend `systemd` on systemd-based hosts such as RHEL/Rocky and with cgroup v2. With containerd 2.x, the kubelet automatically detects the cgroup driver from containerd. ```bash sed -i 's/SystemdCgroup = false/SystemdCgroup = true/g' /etc/containerd/config.toml grep -n 'SystemdCgroup' /etc/containerd/config.toml ``` containerd 2.x uses a newer config format, so the setting is now under a different section. The `sed` command still works because it only changes the value: ```bash [plugins.'io.containerd.cri.v1.runtime'.containerd.runtimes.runc.options] SystemdCgroup = true ``` (On containerd 1.x the section was `[plugins."io.containerd.grpc.v1.cri".containerd.runtimes.runc.options]`.) Enable and start containerd so it also starts on boot: ```bash systemctl enable --now containerd.service ``` Reboot the machine to apply the SELinux, module and NetworkManager changes: ```bash systemctl reboot ``` After the reboot, check that containerd is up and running: ```bash systemctl status containerd.service ``` **Alternative runtime:** CRI-O can be used instead of containerd. It is installed from the CRI-O project's own packages (see the [cri-o/packaging README](https://github.com/cri-o/packaging/blob/main/README.md#usage)), and its socket is `unix:///var/run/crio/crio.sock`. Install only one container runtime per node. If kubeadm detects more than one, specify which to use with `--cri-socket`. ### Step 5: Install Kubernetes Components Install kubelet, kubeadm and kubectl on **every node** from the official community-owned repository at `pkgs.k8s.io`. Each Kubernetes minor version has its own repository; this one only has packages for **v1.37**. For another supported minor (1.36 or 1.35), change `v1.37` in both URLs.Add Kubernetes Repository
The `exclude` line stops a normal `dnf update` from upgrading the Kubernetes packages. Kubernetes upgrades must follow the `kubeadm upgrade` procedure. ```bash # This overwrites any existing configuration in /etc/yum.repos.d/kubernetes.repo cat <Enable the kubelet Service
```bash systemctl enable --now kubelet ``` To verify the installation so far, run: ```bash kubeadm version kubelet --version kubectl version --client ``` Don't worry about kubelet errors at this point. The kubelet restarts in a loop until `kubeadm init` (control plane) or `kubeadm join` (workers) gives it a configuration.Continued in [RedHat - Kubernetes Cluster on RHEL 9.x | Rocky 9.x (Part 2): Control Plane, Workers & Test](https://docs.thehomestack.io/books/linux/page/redhat-kubernetes-cluster-on-rhel-9x-rocky-9x-part-2-control-plane-workers-test).
# RedHat - Kubernetes Cluster on RHEL 9.x | Rocky 9.x (Part 2): Control Plane, Workers & TestThis page continues [RedHat - Install a Kubernetes Cluster on RHEL 9.x | Rocky 9.x: A Step-by-Step Guide](https://docs.thehomestack.io/books/linux/page/redhat-install-a-kubernetes-cluster-on-rhel-9x-rocky-9x-a-step-by-step-guide).
## Install a Kubernetes Cluster on RHEL 9.x | Rocky 9.x: Control Plane (Master) Node Configuration NOTE: Up to this point, we've installed and configured the Kubernetes components on all nodes. From here on, we will focus on the control plane (master) node, called `k8s-master` in the examples. ### Step 6: Initialize the Kubernetes Control Plane Optionally, pre-pull the control plane images: ```bash kubeadm config images pull ``` This downloads the control plane container images (API server, controller manager, scheduler, etcd, CoreDNS, kube-proxy, pause) from `registry.k8s.io`, so `kubeadm init` doesn't have to download them. `kubeadm init` pulls them automatically if you skip this step. Now initialize the control plane: ```bash kubeadm init --pod-network-cidr 10.244.0.0/16 --control-plane-endpoint "Set Up kubeconfig File
Set up the kubeconfig file so kubectl can talk to the cluster. Run these commands as the user who will run kubectl: ```bash mkdir -p $HOME/.kube sudo cp -i /etc/kubernetes/admin.conf $HOME/.kube/config sudo chown $(id -u):$(id -g) $HOME/.kube/config ``` Alternatively, if you are the root user: ```bash export KUBECONFIG=/etc/kubernetes/admin.conf ````admin.conf` grants cluster-admin rights, and `super-admin.conf` bypasses RBAC entirely. Do not share either file; the official docs recommend moving `super-admin.conf` to a safe location.
Deploy Pod Network (Calico)
A CNI network add-on is required. CoreDNS does not start until one is installed. The steps below follow the current official Calico operator install for **Calico v3.33.0**, which is tested against Kubernetes 1.35, 1.36 and 1.37. Install the Calico custom resource definitions (this manifest is for Kubernetes 1.36 or later): ```bash kubectl create -f https://raw.githubusercontent.com/projectcalico/calico/v3.33.0/manifests/v3_projectcalico_org.yaml ``` Install the Tigera Operator: ```bash kubectl create -f https://raw.githubusercontent.com/projectcalico/calico/v3.33.0/manifests/tigera-operator.yaml ``` Download the custom resources manifest (iptables data plane): ```bash curl -O https://raw.githubusercontent.com/projectcalico/calico/v3.33.0/manifests/custom-resources.yaml ``` Or using `wget`: ```bash wget https://raw.githubusercontent.com/projectcalico/calico/v3.33.0/manifests/custom-resources.yaml ``` The manifest defaults to a `192.168.0.0/16` pod pool. Change the `cidr` setting to match the `--pod-network-cidr` you passed to `kubeadm init`: ```bash sed -i 's/cidr: 192\.168\.0\.0\/16/cidr: 10.244.0.0\/16/g' custom-resources.yaml grep -n 'cidr' custom-resources.yaml ``` Finally, create the Calico custom resources: ```bash kubectl create -f custom-resources.yaml ``` Watch the rollout until every component shows `True` in the `AVAILABLE` column (this takes a few minutes): ```bash watch kubectl get tigerastatus ``` ### Step 7: Join Worker Nodes After the control plane is initialized, join the worker nodes to the cluster. Kubernetes provides a join command that includes a token and the control plane's address.Get Join Command on the Control Plane Node
If you didn't save the join command from `kubeadm init`, or its token has expired (the token created by `kubeadm init` is valid for 24 hours), generate a new one on the control plane node: ```bash kubeadm token create --print-join-command ```Run Join Command on Worker Nodes
Run the join command as root on each worker node. It looks like this: ```bash kubeadm joinVerify Worker Node Join
Back on the control plane node, check that the workers have joined: ```bash kubectl get nodes ``` This should list all nodes in the cluster: the control plane node and the newly joined workers. When Calico is running on a node, its status becomes **Ready**, which means it can accept workloads. ### NGINX Test Deployment To test your cluster, deploy a simple application such as an NGINX web server. Here's a sample YAML manifest that deploys NGINX as a test deployment: ```yaml apiVersion: apps/v1 kind: Deployment metadata: name: nginx-deployment labels: app: nginx spec: replicas: 3 selector: matchLabels: app: nginx template: metadata: labels: app: nginx spec: containers: - name: nginx image: nginx:latest ports: - containerPort: 80 ```Deploy NGINX
Save the YAML above to a file named `nginx-deployment.yaml`, then apply it with `kubectl apply`: ```bash kubectl apply -f nginx-deployment.yaml ``` ```bash deployment.apps/nginx-deployment created ``` This creates three NGINX pod replicas, each running a container that exposes port 80. To check the status of the deployment: ```bash kubectl get deployments ``` ```bash NAME READY UP-TO-DATE AVAILABLE AGE nginx-deployment 3/3 3 3 2m40s ``` To verify that the NGINX pods are running: ```bash kubectl get pods ``` ```bash NAME READY STATUS RESTARTS AGE nginx-deployment-7c79c4bf97-gnbfn 1/1 Running 0 6m6s nginx-deployment-7c79c4bf97-tmbpg 1/1 Running 0 6m6s nginx-deployment-7c79c4bf97-vgh42 1/1 Running 0 6m6s ```Expose NGINX to the external network
Once the pods are running, expose NGINX outside the cluster with a Kubernetes Service: ```yaml apiVersion: v1 kind: Service metadata: name: nginx-service spec: selector: app: nginx ports: - protocol: TCP port: 80 targetPort: 80 type: LoadBalancer ``` Save the YAML above to a file named `nginx-service.yaml`, then apply it: ```bash kubectl apply -f nginx-service.yaml ``` ```bash service/nginx-service created ``` This creates a Service of type LoadBalancer. To see its external IP address and ports: ```bash kubectl get service nginx-service ``` Once you have the external IP address, open it in a web browser. You should see the default NGINX welcome page, which shows the cluster is serving web traffic.On bare-metal or VM clusters (like this one), nothing provisions LoadBalancer services out of the box, so `EXTERNAL-IP` stays `
Reviewed October 2026 against RHEL 9.8 and NVIDIA data center driver branch 615. This guide uses an NVIDIA **Tesla M10 (Maxwell)**. NVIDIA driver branch **R580** is the last branch that supports Maxwell, Pascal and Volta GPUs. It is a Long Term Support Branch with end of life in June 2028, so a Maxwell card must stay on the **580** proprietary DKMS stream. Newer branches drop Maxwell, and from branch 615 NVIDIA ships only the open kernel modules, which need Turing or newer.
#### Step 1: Enable GPU passthrough on the ESXi host 1. In the host BIOS/UEFI, make sure **Intel VT-d** (AMD: **IOMMU**) is enabled and PCI mapping above 4 GB is allowed. 2. In the vSphere Client select the host, then **Configure > Hardware > PCI Devices** and open **All PCI Devices**. (ESXi Host Client: **Manage > Hardware > PCI Devices**.) 3. Select the NVIDIA GPU and click **Toggle Passthrough**. 4. If the device shows an orange icon, put the host in maintenance mode and reboot it before using the device. The passthrough status should then show as Enabled/Active. #### Step 2: Configure the RHEL 9 virtual machine 1. Power off the virtual machine. **This is required before assigning PCI devices.** 2. Edit the settings of the RHEL 9 VM in the vSphere Client. 3. Under **VM Options > Boot Options** set **Firmware** to **EFI**, because GPU passthrough VMs will not boot correctly on legacy BIOS. 4. **Turn off Secure Boot (required):** with the VM still powered off, go to **Edit Settings > VM Options > Boot Options** and uncheck **Secure Boot**. With Secure Boot on, the NVIDIA kernel modules built in Step 4 are unsigned and will not load unless you sign them yourself and enroll the key (MOK). This guide does not use module signing, so Secure Boot must be off. 5. Under **Virtual Hardware**, click **Add New Device**, choose **PCI Device** and select the NVIDIA GPU you enabled for passthrough. 6. Under **Memory**, reserve all guest memory (All locked). A passthrough device needs the full memory reservation. 7. Go to **VM Options > Advanced**, click **Edit Configuration** and add these parameters: - `pciPassthru.use64bitMMIO = TRUE` - `pciPassthru.64bitMMIOSizeGB = 64`: the value depends on GPU memory. Broadcom's rule is to add up the framebuffer memory of every GPU in the VM. If the total is a power of 2, use the next power of 2. If it falls between two powers of 2, round up twice. One Tesla M10 GPU (8 GB) needs at least **16**; **64** also works. - `hypervisor.cpuid.v0 = FALSE`: used in the tested setup. It is not part of Broadcom's GPU passthrough KBs. 8. Save the VM settings and power on the VM. #### Step 3: Prepare the OS **VMware tools:** Broadcom recommends the open-vm-tools package shipped by Red Hat. ```shell sudo dnf install -y open-vm-tools ``` **Enable CodeReady Builder and EPEL:** the NVIDIA driver RPMs depend on packages that only exist in EPEL (for example DKMS). ```shell sudo subscription-manager repos --enable=codeready-builder-for-rhel-9-x86_64-rpms sudo dnf install https://dl.fedoraproject.org/pub/epel/epel-release-latest-9.noarch.rpm ``` **Install build dependencies:** DKMS needs the kernel headers and development packages. On RHEL 9 NVIDIA uses `kernel-devel-matched`, which also installs the matching devel package for future kernel updates so DKMS can rebuild the module. ```shell sudo dnf groupinstall "Development Tools" sudo dnf install kernel-devel-matched kernel-headers ``` **Disable the Nouveau driver (optional):** the open-source Nouveau driver can conflict with the NVIDIA driver. The NVIDIA RPMs disable nouveau automatically during install (`nvidia-boot-update`). To do it by hand: ```shell sudo bash -c "echo blacklist nouveau > /etc/modprobe.d/blacklist-nvidia-nouveau.conf" sudo bash -c "echo options nouveau modeset=0 >> /etc/modprobe.d/blacklist-nvidia-nouveau.conf" sudo dracut --force sudo reboot ``` #### Step 4: Install the NVIDIA driver (580 branch, proprietary DKMS)For Maxwell GPUs such as the Tesla M10, do **not** use `nvidia-driver:latest-dkms`, `nvidia-driver:open-dkms` or `nvidia-open`. In NVIDIA's RHEL 9 repository `latest-dkms` now resolves to the 610 branch, which no longer supports Maxwell. The open kernel modules only support Turing and newer GPUs.
**Add the repository:** NVIDIA's network repository for RHEL 9. ```shell sudo dnf config-manager --add-repo https://developer.download.nvidia.com/compute/cuda/repos/rhel9/x86_64/cuda-rhel9.repo sudo dnf clean expire-cache ``` **Install the driver:** use the `dnf module` stream locked to the **580** branch with proprietary DKMS modules. Its default profile installs the full driver plus `kmod-nvidia-latest-dkms`. ```shell sudo dnf module install nvidia-driver:580-dkms ``` Later updates stay on the 580 branch with a normal `sudo dnf update`. **Secure Boot:** the DKMS-built proprietary modules are not signed by Red Hat. Red Hat-signed precompiled NVIDIA modules exist only for the open kernel modules (RHEL 10), which Maxwell GPUs cannot use. Secure Boot must be off (Step 2). Check it inside the VM before installing the driver: ```bash mokutil --sb-state ``` The output should be `SecureBoot disabled`. If it says `SecureBoot enabled`, power off the VM and uncheck Secure Boot under **Edit Settings > VM Options > Boot Options**. Reboot the VM: ```shell sudo reboot ``` #### Step 5: Verify the installation After the VM reboots, run `nvidia-smi`. If the install worked, it shows the GPU, which confirms that the RHEL guest is using it through passthrough: ```shell $ nvidia-smi +-----------------------------------------------------------------------------------------+ | NVIDIA-SMI 580.95.05 Driver Version: 580.95.05 CUDA Version: 13.0 | +-----------------------------------------+------------------------+----------------------+ | GPU Name Persistence-M | Bus-Id Disp.A | Volatile Uncorr. ECC | | Fan Temp Perf Pwr:Usage/Cap | Memory-Usage | GPU-Util Compute M. | | | | MIG M. | |=========================================+========================+======================| | 0 Tesla M10 Off | 00000000:XX:00.0 Off | N/A | | N/A 36C P8 8W / 53W | 3MiB / 8192MiB | 0% Default | | | | N/A | +-----------------------------------------+------------------------+----------------------+ +-----------------------------------------------------------------------------------------+ | Processes: | | GPU GI CI PID Type Process name GPU Memory | | ID ID Usage | |=========================================================================================| | No running processes found | +-----------------------------------------------------------------------------------------+ ``` #### Step 6: Set up containers Add NVIDIA's container toolkit repository (the CUDA repository above also carries the same packages): ```shell curl -s -L https://nvidia.github.io/libnvidia-container/stable/rpm/nvidia-container-toolkit.repo | \ sudo tee /etc/yum.repos.d/nvidia-container-toolkit.repo ``` Install the NVIDIA Container Toolkit: ```shell sudo dnf install -y nvidia-container-toolkit ``` The older `nvidia-docker2` / `nvidia-docker` and `nvidia-container-runtime` repositories and packages are not part of NVIDIA's current install guide; use the repository above. ##### Docker Configure Docker to use the NVIDIA runtime and restart it: ```shell sudo nvidia-ctk runtime configure --runtime=docker sudo systemctl restart docker ``` Test it: ```shell $ docker run --rm --runtime=nvidia --gpus all ubuntu nvidia-smi +-----------------------------------------------------------------------------------------+ | NVIDIA-SMI 580.95.05 Driver Version: 580.95.05 CUDA Version: 13.0 | +-----------------------------------------+------------------------+----------------------+ | GPU Name Persistence-M | Bus-Id Disp.A | Volatile Uncorr. ECC | | Fan Temp Perf Pwr:Usage/Cap | Memory-Usage | GPU-Util Compute M. | | | | MIG M. | |=========================================+========================+======================| | 0 Tesla M10 Off | 00000000:XX:00.0 Off | N/A | | N/A 36C P8 8W / 53W | 3MiB / 8192MiB | 0% Default | | | | N/A | +-----------------------------------------+------------------------+----------------------+ +-----------------------------------------------------------------------------------------+ | Processes: | | GPU GI CI PID Type Process name GPU Memory | | ID ID Usage | |=========================================================================================| | No running processes found | +-----------------------------------------------------------------------------------------+ ``` ##### Podman (CDI) For Podman, RHEL's built-in container engine, NVIDIA recommends CDI instead of `nvidia-ctk runtime configure`. Since toolkit v1.18 the `nvidia-cdi-refresh` service generates the CDI spec automatically at `/var/run/cdi/nvidia.yaml`. It runs when the toolkit or driver is installed or upgraded and at boot. List the devices: ```shell nvidia-ctk cdi list ``` Regenerate the spec if needed (for example after removing a driver): ```shell sudo systemctl restart nvidia-cdi-refresh.service # or manually sudo nvidia-ctk cdi generate --output=/var/run/cdi/nvidia.yaml ``` Test it: ```shell podman run --rm --security-opt=label=disable --device=nvidia.com/gpu=all ubuntu nvidia-smi ``` #### Troubleshooting: driver missing after a kernel update With `kernel-devel-matched` installed, DKMS rebuilds the module automatically after kernel updates. If `nvidia-smi` stops working after a kernel update, check which kernels the module is built for: ```shell dkms status ``` Example output where the module is only built for an older kernel: ```shell nvidia/580.95.05, 5.14.0-427.42.1.el9_4.x86_64, x86_64: installed ``` Make sure `kernel-devel` for the running kernel is installed, then build the module for the current kernel. Use the version shown by `dkms status`: ```shell sudo dkms install nvidia/580.95.05 ``` #### References - [NVIDIA Container Toolkit install guide](https://docs.nvidia.com/datacenter/cloud-native/container-toolkit/latest/install-guide.html) and [CDI support](https://docs.nvidia.com/datacenter/cloud-native/container-toolkit/latest/cdi-support.html) - [Ollama Docker image](https://hub.docker.com/r/ollama/ollama) (container configuration) - [NVIDIA blog: driver module streams on RHEL](https://developer.nvidia.com/blog/streamlining-nvidia-driver-deployment-on-rhel-8-with-modularity-streams/) (background) #### Sources (checked October 2026) - [Red Hat: RHEL release dates](https://access.redhat.com/articles/3078) (RHEL 9.8 GA 2026-05-19) - [NVIDIA Driver Installation Guide: RHEL](https://docs.nvidia.com/datacenter/tesla/driver-installation-guide/red-hat-enterprise-linux.html), [Recent Updates](https://docs.nvidia.com/datacenter/tesla/driver-installation-guide/recent-updates.html) (proprietary modules removed), [Advanced Options](https://docs.nvidia.com/datacenter/tesla/driver-installation-guide/advanced-options.html) (nvidia-boot-update) - [NVIDIA supported drivers](https://docs.nvidia.com/datacenter/tesla/drivers/supported-drivers-and-cuda-toolkit-versions.html) and [NVIDIA blog: R580 last branch for Maxwell/Pascal/Volta](https://developer.nvidia.com/blog/navigating-gpu-architecture-support-a-guide-for-nvidia-cuda-developers/) - [NVIDIA Container Toolkit sample workload](https://docs.nvidia.com/datacenter/cloud-native/container-toolkit/latest/sample-workload.html) - [Broadcom KB 334594](https://knowledge.broadcom.com/external/article/334594) (EFI + 64-bit MMIO sizing), [KB 312208](https://knowledge.broadcom.com/external/article/312208/vsphere-vmdirectpath-io-and-dynamic-dire.html) (DirectPath I/O requirements), [KB 309986](https://knowledge.broadcom.com/external/article?articleNumber=309986) (Toggle Passthrough), [KB 313456](https://knowledge.broadcom.com/external/article/313456/vmware-support-for-openvmtools.html) (open-vm-tools)