# TrueNAS
TrueNAS setup, mounts and backups.
# TrueNAS - Login PS1 Prompt with Warning and Bash Colors
### Change the colors of the shell do the following steps:
#### Step 1:
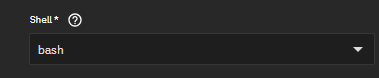
Change the shell on the user in `Credentials/Users` and then Edit the user you are using to log in and change the following.
[](https://docs.thehomestack.io/uploads/images/gallery/2026-03/image.png)
#### Step 2:
Add the following entries to create the default files for any login
Creating Aliases
```bash
sudo cat > /etc/profile.d/custom-aliases.sh << EOF
# Common interactive aliases for all users
alias rm='rm -i'
alias cp='cp -i'
alias mv='mv -i'
alias vi='vim'
alias tailf='tail -f'
EOF
```
Server Warning
```bash
sudo tee /etc/profile.d/custom-prod-warning.sh > /dev/null << 'EOF'
# /etc/profile.d/custom-prod-warning.sh
# Production warning banner – only for real interactive logins
# 1. Exit immediately if this is not an interactive shell
[[ $- != *i* ]] && return
# 2. Exit if we don't have a real terminal
[[ -t 0 && -t 1 ]] || return
# 3. Exit if SSH is running a forced command (rsync, scp, ansible, etc.)
# OpenSSH sets SSH_ORIGINAL_COMMAND in these cases
[[ -n "${SSH_ORIGINAL_COMMAND:-}" ]] && return
# --- Safe to show the banner from here ---
RED='\033[1;31m'
YELLOW='\033[1;33m'
NC='\033[0m'
echo
if command -v figlet >/dev/null 2>&1; then
figlet -f big "PRODUCTION" | while IFS= read -r line; do
printf '%b%s%b\n' "$RED" "$line" "$NC"
done
figlet -f big "SERVER" | while IFS= read -r line; do
printf '%b%s%b\n' "$RED" "$line" "$NC"
done
else
echo -e "${RED}***** PRODUCTION SERVER!! *****${NC}"
fi
echo
echo -e "${YELLOW} *** EXTREME CAUTION REQUIRED ***${NC}"
echo -e "${RED}This is a LIVE PRODUCTION system.${NC}"
echo -e "${RED}Unauthorized access is strictly prohibited.${NC}"
echo -e "${RED}All activity is logged and monitored.${NC}"
echo -e "${YELLOW}Think twice before running commands!${NC}"
echo
EOF
```
Creating Colorful Prompts
```bash
sudo tee /etc/profile.d/custom-prompt-and-colors.sh > /dev/null << 'EOF'
# Custom LS_COLORS and improved multi-line colored prompt
# Vibrant LS_COLORS (directories bold blue on gray, etc.)
LS_COLORS='rs=0:di=01;44:ln=01;36:mh=00:pi=40;33:so=01;35:do=01;35:bd=40;33;01:cd=40;33;01:or=40;31;01:su=37;41:sg=30;43:ca=30;41:tw=30;42:ow=34;42:st=37;44:ex=01;32:*.tar=01;31:*.tgz=01;31:*.arj=01;31:*.taz=01;31:*.lzh=01;31:*.lzma=01;31:*.tlz=01;31:*.txz=01;31:*.zip=01;31:*.z=01;31:*.Z=01;31:*.dz=01;31:*.gz=01;31:*.lz=01;31:*.xz=01;31:*.bz2=01;31:*.bz=01;31:*.tbz=01;31:*.tbz2=01;31:*.tz=01;31:*.deb=01;31:*.rpm=01;31:*.jar=01;31:*.rar=01;31:*.ace=01;31:*.zoo=01;31:*.cpio=01;31:*.7z=01;31:*.rz=01;31:*.jpg=01;35:*.jpeg=01;35:*.gif=01;35:*.bmp=01;35:*.pbm=01;35:*.pgm=01;35:*.ppm=01;35:*.tga=01;35:*.xbm=01;35:*.xpm=01;35:*.tif=01;35:*.tiff=01;35:*.png=01;35:*.svg=01;35:*.svgz=01;35:*.mng=01;35:*.pcx=01;35:*.mov=01;35:*.mpg=01;35:*.mpeg=01;35:*.m2v=01;35:*.mkv=01;35:*.ogm=01;35:*.mp4=01;35:*.m4v=01;35:*.mp4v=01;35:*.vob=01;35:*.qt=01;35:*.nuv=01;35:*.wmv=01;35:*.asf=01;35:*.rm=01;35:*.rmvb=01;35:*.flc=01;35:*.avi=01;35:*.fli=01;35:*.flv=01;35:*.gl=01;35:*.dl=01;35:*.xcf=01;35:*.xwd=01;35:*.yuv=01;35:*.cgm=01;35:*.emf=01;35:*.axv=01;35:*.anx=01;35:*.ogv=01;35:*.ogx=01;35:*.aac=00;36:*.au=00;36:*.flac=00;36:*.mid=00;36:*.midi=00;36:*.mka=00;36:*.mp3=00;36:*.mpc=00;36:*.ogg=00;36:*.ra=00;36:*.wav=00;36:*.axa=00;36:*.oga=00;36:*.spx=00;36:*.xspf=00;36:'
export LS_COLORS
# Build a combined OS_NAME: Debian base + TrueNAS SCALE build
if [ -f /etc/os-release ]; then
. /etc/os-release
OS_NAME="${PRETTY_NAME}"
fi
if [ -f /etc/version ]; then
TRUENAS_VER="TrueNAS SCALE ($(cat /etc/version 2>/dev/null))"
OS_NAME="${OS_NAME} / ${TRUENAS_VER}"
fi
export OS_NAME
# Only set up the fancy colored prompt in real interactive terminals
if [[ $- == *i* ]] && [[ -t 0 && -t 1 ]] && [[ -z "${SSH_ORIGINAL_COMMAND:-}" ]]; then
# Color and style variables
RESET=$(tput sgr0)
BOLD=$(tput bold)
BG_GRAY=$(tput setab 8)
FG_RED=$(tput setaf 1)
FG_MAGENTA=$(tput setaf 5)
FG_GREEN=$(tput setaf 2)
FG_CYAN=$(tput setaf 6)
# Multi-line prompt – all non-printing sequences wrapped in \[ \]
PS1="\n"
PS1+="\[${BOLD}${BG_GRAY}${FG_RED}\]\u"
PS1+="\[${FG_MAGENTA}\]@"
PS1+="\[${FG_RED}\]\`hostname\`"
PS1+="\[${FG_GREEN}\] : \`uname\` : "
PS1+="\[${FG_CYAN}\]\d \t : \${PLANTID:+\$PLANTID }"
PS1+="\[${RESET}\]\n"
PS1+="\[${FG_CYAN}\][\w]"
PS1+="\[${RESET}${BOLD}\] \\$ \[${RESET}\]"
export PS1
fi
EOF
```
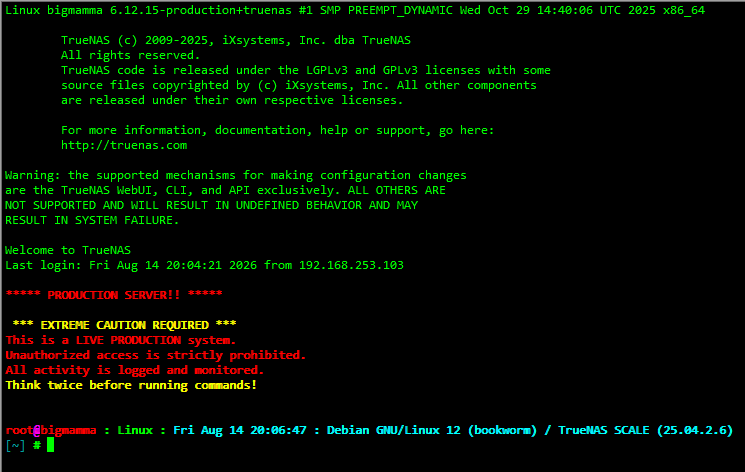
#### Result
[](https://docs.thehomestack.io/uploads/images/gallery/2026-08/Lmbimage.png)
# TrueNAS - SCALE Create a local Backup and Send to S3 Buckets
To automate backing up your TrueNAS configuration directly to Amazon S3 or any S3-compatible cloud storage, you need to create a **local backup script** and pair it with a **TrueNAS Cloud Sync task**
TrueNAS automatically saves daily configuration databases locally to your system dataset, but exporting it safely off-site requires grabbing the full archive (with the secret seed) via a middleware command (`midclt`).
#### Step 1: Create a Local Dataset and Script
First, create an isolated directory on your storage pool where TrueNAS will output the configuration files before uploading them. [[1](https://www.youtube.com/watch?v=I7oH-QE_TSA)]
1. Navigate to **Storage** > **Datasets** and click **Add Dataset**. Name it something distinct like `system-backups`.
2. Open a shell or connection to your TrueNAS system. Create a script named `backup_config.sh` inside that dataset folder:```bash
nano /mnt/YOUR_POOL/system-backups/backup_config.sh
```
3. Paste the following script, which requests the configuration archive from the TrueNAS API engine (`midclt`), saves it with a timestamp, and purges backups older than 30 days to avoid clutter:```bash
#!/bin/bash
BACKUP_DIR="/mnt/YOUR_POOL/system-backups"
DATE=$(date +%Y%m%d-%H%M%S)
FILENAME="truenas-config-${DATE}.tar"
# 1. Request the configuration download job from the SCALE API
JOB_DATA=$(midclt call core.download "config.save" '[{"secretseed": true}]' "${FILENAME}")
# 2. Extract the download path cleanly using jq (returns: /_download/JOB_ID?auth_token=TOKEN)
DOWNLOAD_PATH=$(echo "$JOB_DATA" | jq -r '.[1]')
# 3. Pull the actual file directly using the exact path provided by the API
curl -s -k --output "${BACKUP_DIR}/${FILENAME}" "http://127.0.0.1${DOWNLOAD_PATH}"
# 4. Delete backups older than 30 days
find "${BACKUP_DIR}" -name "truenas-config-*.tar" -type f -mtime +30 -delete
```
4. Make the script executable:```
chmod +x /mnt/YOUR_POOL/system-backups/backup_config.sh
```
#### Step 2: Automate the Script via Cron Job
Schedule TrueNAS to execute this script automatically every day before sending the files offsite.
1. Navigate to **System** > **Advanced Settings** >**Cron Jobs** and click **Add**.
2. **Description**: `Generate Daily Config Backup Archive`
3. **Command**: `/mnt/YOUR_POOL/system-backups/backup_config.sh`
4. **Run As User**: `root`
5. **Schedule**: Set it to run daily (e.g., Every day at `02:00` AM).
6. Click **Save**.
#### Step 3: Link Your S3 Bucket Credentials
Now, prepare TrueNAS to communicate securely with your S3 bucket. [[1](https://www.truenas.com/docs/scale/23.10/gettingstarted/configure/setupbackupscale/)]
1. Go to **Credentials** > **Backup Credentials** > **Cloud Credentials** and click **Add**.
2. Name the credential (e.g., `AWS-S3-Backup`).
3. Under **Provider**, select **Amazon S3** (or generic S3 if using Wasabi, Backblaze B2, or MinIO).
4. Paste your cloud account's **Access Key ID** and **Secret Access Key**.
5. Click **Verify** to confirm the handshake with AWS is successful, then click **Save**
#### Step 4: Configure the Offsite S3 Cloud Sync Task
The final step uses TrueNAS's built-in replication tools to synchronize your backup folder to the cloud. [[1](https://www.youtube.com/watch?v=wwt9dDhsgJw)]
1. Navigate to **Data Protection** > **Cloud Sync Tasks** and click **Add**.
2. **Description**: `Sync Config Backups to S3`
3. **Direction**: Select **PUSH** (this uploads data *to* the cloud).
4. **Transfer Mode**: Select **SYNC** (mirrors your local folder; automatically handles remote file deletion when files age out locally).
5. **Directory/Files**: Choose your local path: `/mnt/YOUR_POOL/system-backups`.
6. **Credential**: Select the `AWS-S3-Backup` credential you created in Step 3.
7. **Bucket**: Select your designated target S3 bucket from the auto-populated drop-down menu.
8. **Schedule**: Set this to run daily, at least one hour *after* the local Cron Job (e.g., Every day at `03:00` AM).
9. Click **Save**.
💡 Pro-Tip: S3 Bucket Security
Because TrueNAS configuration files contain your system's password hashes, API tokens, and private networking configurations, it is highly recommended to enable **Server-Side Encryption (SSE-S3)** and **Bucket Versioning** directly inside your AWS S3 Console. This adds a layer of defense against accidental deletion or ransomware targeting your NAS shares.
# TrueNAS - Custom Mounts
**Last verified:** October 2026 against the TrueNAS Community Edition 25.10 documentation (Init/Shutdown Scripts). See Sources.
TrueNAS does not keep manual `mount` commands or `/etc/fstab` edits across reboots. To mount NFS shares from another server (for example a Synology or another NAS) every time TrueNAS starts, run a mount script as a **Post Init** Init/Shutdown script. Use this when apps or tasks on TrueNAS need data that lives on another NAS.
### Prerequisites
- TrueNAS Community Edition (formerly SCALE). UI paths below match 25.10.
- An NFS export on the remote server that allows this TrueNAS host to mount it.
- A pool on TrueNAS to hold the script and the mount points (`/mnt//...`).
- Admin access to the TrueNAS web UI and a shell (System > Shell or SSH).
### 1) Create the mount script
Store the script on a pool so it survives updates, for example `/mnt//scripts/custom_mount.sh`:
```bash
#!/bin/bash
# Mount NFS exports from another NAS after TrueNAS boots.
mount_nfs() {
local src="$1" dst="$2"
mkdir -p "$dst"
mountpoint -q "$dst" || mount -t nfs "$src" "$dst"
}
mount_nfs :/ /mnt//
mount_nfs :/ /mnt//
```
Make it executable. The Init/Shutdown script must have the execute bit set:
```bash
chmod +x /mnt//scripts/custom_mount.sh
```
### 2) Add it as a Post Init script
1. Go to **System > Advanced Settings**. On the **Init/Shutdown Scripts** widget, click **Add**.
2. **Description:** for example `Mount NFS shares`.
3. **Type:** **Script**, then select `/mnt//scripts/custom_mount.sh`. (**Command** with the script path also works.)
4. **When:** **Post Init**.
5. **Enabled:** checked.
6. **Timeout:** the default is 10 seconds. Raise it (for example to 60) if you mount several shares or the remote NAS is slow to answer.
7. Click **Save**.
### 3) Verify
Run the script once by hand, or reboot TrueNAS, then check the mounts:
```bash
sudo /mnt//scripts/custom_mount.sh
findmnt -t nfs,nfs4
df -h | grep
```
Each share should be listed at its `/mnt//` path.
### Troubleshooting / notes
- **Nothing is mounted after a reboot:** make sure the script is executable and starts with `#!/bin/bash` (otherwise it runs under dash). Then check that the remote NAS was reachable at boot and that the Timeout was long enough.
- **Permission denied / access denied by server:** allow the TrueNAS IP in the NFS export rules on the remote NAS.
- The `mountpoint -q` check stops the script from mounting the same share twice when you run it again by hand.
- For an app that needs the data, point the app at the mounted path (`/mnt//`) after the share is mounted.
#### Sources
- [TrueNAS docs: Managing Init/Shutdown Scripts (25.10)](https://www.truenas.com/docs/scale/25.10/scaletutorials/systemsettings/advanced/manageinitshutdownscale/)
- [TrueNAS docs: Advanced Settings Screen (25.10)](https://www.truenas.com/docs/scale/25.10/scaleuireference/systemsettings/advancedsettingsscreen/)
- [TrueNAS API: initshutdownscript.create (timeout default 10 s)](https://api.truenas.com/v25.10/api_methods_initshutdownscript.create.html)
# TrueNAS - Backup Config to S3
**Last verified:** October 2026 against the TrueNAS Community Edition 25.10 documentation and AWS IAM/S3 documentation. See Sources.
This guide sets up two off-site backups from TrueNAS to Amazon S3: a daily archive of the **TrueNAS system configuration**, and the **app data / Docker stacks** folder. Both are uploaded with TrueNAS **Cloud Sync Tasks**. Use it so you can rebuild the NAS configuration and apps if the boot device or the system fails.
The configuration archive contains the **password secret seed** (`pwenc_secret`) and the config database. Together they decrypt stored credentials (cloud credentials, SSH keys, certificates, SMB hashes and so on). Keep the backups in a **private bucket**, enable **Remote Encryption** on the Cloud Sync task (step 5), and restrict the local folder to root.
### Prerequisites
- TrueNAS Community Edition (formerly SCALE). UI paths below match 25.10.
- An AWS account with a private S3 bucket per backup (``, ``), or one bucket with separate folders. Block Public Access stays on.
- A dataset for local archives, for example `/mnt//system-backups`, and the app data folder, for example `/mnt//`.
- Admin access to the TrueNAS web UI.
### 1) Create an IAM user for TrueNAS
In AWS IAM, create a dedicated user (for example ``) with an access key. Give it access only to the backup bucket(s). Repeat the bucket lines for each bucket:
```json
{
"Version": "2012-10-17",
"Statement": [
{
"Effect": "Allow",
"Action": ["s3:ListBucket", "s3:GetBucketLocation"],
"Resource": "arn:aws:s3:::"
},
{
"Effect": "Allow",
"Action": ["s3:GetObject", "s3:PutObject", "s3:DeleteObject"],
"Resource": "arn:aws:s3:::/*"
}
]
}
```
Store the Access Key ID and Secret Access Key in a password manager. Do not put them in scripts or documentation.
### 2) Add the S3 cloud credential in TrueNAS
1. Go to **Credentials > Backup Credentials**. On **Cloud Credentials**, click **Add**.
2. **Provider:** Amazon S3. **Name:** for example `AWS S3 Backup`.
3. **Access Key ID:** ``. **Secret Access Key:** ``.
4. Leave **Endpoint URL** empty for AWS. Set **Region** to the bucket region (for example ``).
5. Click **Verify Credentials**, then **Save**.
### 3) Create the config backup script
Save this as `/mnt//system-backups/backup_config.sh`:
```bash
#!/bin/bash
# Save the TrueNAS config database and secret seed to a dated archive.
BACKUP_DIR="/mnt//system-backups"
DATE=$(date +%Y%m%d-%H%M%S)
FILENAME="truenas-config-${DATE}.tar"
tar -cf "${BACKUP_DIR}/${FILENAME}" -C /data freenas-v1.db pwenc_secret
if [ ! -s "${BACKUP_DIR}/${FILENAME}" ]; then
echo "ERROR: backup file is empty or missing" >&2
exit 1
fi
chmod 600 "${BACKUP_DIR}/${FILENAME}"
# Keep 30 days of local archives
find "${BACKUP_DIR}" -name "truenas-config-*.tar" -type f -mtime +30 -delete
```
```bash
chmod 700 /mnt//system-backups/backup_config.sh
```
### 4) Schedule the script with a cron job
1. Go to **System > Advanced Settings**. On **Cron Jobs**, click **Add**.
2. **Description:** `Daily config backup archive`. **Command:** `/mnt//system-backups/backup_config.sh`.
3. **Run As User:** `root`. **Schedule:** daily, for example `0 2 * * *` (02:00).
4. Leave **Hide Standard Error** cleared so failures are reported. Check **Enabled** and click **Save**.
### 5) Create the Cloud Sync tasks
Go to **Data Protection > Cloud Sync Tasks** and click **Add**. Create one task per source:
| Setting | Config backup | App data / stacks |
|---|
| Credential | The S3 credential from step 2 | Same |
| Direction / Transfer Mode | PUSH / SYNC (or COPY, see notes) | PUSH / SYNC |
| Directory/Files | `/mnt//system-backups` | `/mnt//` |
| Bucket / Folder | `` / `/system-backups` | `` / `/` |
| Schedule | After the cron job, for example 02:15 daily | Daily, for example 00:00 |
| Advanced Options | **Remote Encryption** on (Encryption Password + Salt) | Remote Encryption recommended. Follow Symlinks only if the stacks use them. |
Save the Remote Encryption password and salt in your password manager. Without them the uploaded files cannot be restored.
### 6) Verify
1. Run the script once in **System > Shell** and check that a new archive appears:
```bash
sudo /mnt//system-backups/backup_config.sh
ls -lh /mnt//system-backups/
```
2. On **Data Protection > Cloud Sync Tasks**, click **Run Now** on each task (you can use **Dry Run** first). The state should show **SUCCESS**.
3. In the AWS S3 console, confirm the objects exist in each bucket and folder.
### Troubleshooting / notes
- **SYNC vs COPY:** SYNC makes the bucket match the source, so archives the script deletes after 30 days are deleted in S3 too. Use COPY plus an S3 lifecycle rule if you want longer retention in S3.
- **Official config export:** the supported manual method is **System > Advanced Settings > Manage Configuration > Download File** with **Export Password Secret Seed** selected. Do this before upgrades. The script automates a similar archive. Restore with **Manage Configuration > Upload File**.
- **Credential errors:** check the IAM policy bucket names and the Region, then click **Verify Credentials** again.
- **Glacier:** Cloud Sync cannot delete objects that were moved to S3 Glacier / Deep Archive.
- **Stopped apps:** stop or quiesce apps with databases before backup, or use **Use Snapshot** on the task, to get consistent copies.
#### Sources
- [TrueNAS docs: Managing the System Configuration (25.10)](https://www.truenas.com/docs/scale/25.10/scaletutorials/systemsettings/advanced/managesysconfig/)
- [TrueNAS docs: Advanced Settings Screen, Cron Jobs and Manage Configuration (25.10)](https://www.truenas.com/docs/scale/25.10/scaleuireference/systemsettings/advancedsettingsscreen/)
- [TrueNAS docs: Adding Cloud Credentials (25.10)](https://www.truenas.com/docs/scale/25.10/scaletutorials/credentials/backupcredentials/addcloudcredentials/)
- [TrueNAS docs: Cloud Sync Tasks, incl. Remote Encryption (25.10)](https://www.truenas.com/docs/scale/25.10/scaletutorials/dataprotection/cloudsynctasks/)
- [AWS: Amazon S3 policy examples](https://docs.aws.amazon.com/AmazonS3/latest/userguide/example-bucket-policies.html)
- [AWS: Blocking public access to S3 storage](https://docs.aws.amazon.com/AmazonS3/latest/userguide/access-control-block-public-access.html)