# NAS
# Synology
Synology DSM setup, packages and maintenance.
# Synology - Bag of Tricks
sudo -i
ip link set eth1 down
My DS118 idles at 24% after disabling all the junk.
//run once as root to disable services \*you\* don't need
synopkg stop pkgctl-SynoFinder
synopkg uninstall SynoFinder
synopkg stop pkgctl-ActiveInsight
synopkg uninstall ActiveInsight
synopkg stop pkgctl-ScsiTarget
synopkg uninstall ScsiTarget
synopkg stop pkgctl-SecureSignIn
synopkg uninstall SecureSignIn
synopkg stop pkgctl-Python2
synopkg uninstall Python2
//root task disable thumbnails every boot if you're not indexing
cd /var/packages/FileStation/target/etc/conf/
mv thumbd.conf thumbd.conf.bak
# Downgrade Synology DSM 7 (to 6)
I thought I would take the time to share how I downgraded my Synonlogy 1019+ from DSM version 7 to version 6.2.x. The reason for this was that after upgrading, I was no longer able to use Syncthing, and I really needed this working ON the NAS itself. After the upgrade to DSM 7, Plex broke initially as well, but I have a tip at the end of how I fixed this (if you are keeping DSM 7).
1. BACKUP YOUR CURRENT CONFIGURATION!!!!!!
1. Get Putty. If you have a Mac, you can use Terminal for the first part, but if you've upgraded to the most recent version of OSX, you won't get Telnet in ZSH. So yeah, just use Putty.
2. In your Control Panel (on the NAS), enable Telnet and SSH.
3. Login to your NAS via SSH (using Putty or Terminal), using your admin account and password.
4. Do the following: sudo vi /etc.defaults/VERSION
\[ENTER\]
*when prompted, enter your password*
5.Once in the VI editor, press the "i" (eye) key to be able to insert data. Overwrite all content, and replace it with the following:
majorversion="6" minorversion="2" productversion="6.2.3" buildphase="GM" buildnumber="25426" smallfixnumber="0" builddate="2020/07/01" buildtime="06:24:39"
1. To save, do the following:
\[ESC\]
:wq!
\[ENTER\]
sudo reboot \[ENTER\] (or reboot from the web interface)
1. Once the NAS reboots, use the Synology Assistant to find it. Follow the prompts to reinstall DSM.
1. At the screen that prompts you to choose the version of DSM to install, choose the Manual option, and click the link beside it and download version 6. Download the DSM version you want.
1. Continue the installation process by browsing to, and selecting the DSM version 6 file you just downloaded. As the process continues, you will be met with an error. At this point STOP, the Telnet port will be opened. Do the following:
10\. Using Putty, choose the Telnet option, enter the IP address of your NAS, ensure that port 23 is chosen, and connect.
11\. Enter "root" as the user, and the password of "101-0101" (without the quotes). This is Synology's published default recovery password for this procedure, not a private secret.
12\. Repeat Step 4, except you should not enter "sudo" since you are already root. Repeat Step 5.
13\. It took me quite some time to figure out this one issue. When I would go to save the edited file, I kept getting an error, and it did not make sense. Eventually, I figured it out. Repeat step 6, except don't do the combination write and quit (:wq!) command as before. I had to do a write first, then a quit. As below:
Assuming you entered the information from Step 12...
\[ESC\]
:q \[ENTER\]\[ENTER\]
:w \[ENTER\]\[ENTER\]
14\. Go back to your browser, and continue the installation of DSM 6.
Good luck.
Bonus Tip if you keep DSM 7:
I removed the original steps to fix Plex if you KEEP DSM 7. According to the user below, simply follow Plex’s instructions by downloading the latest version of Plex and using that. Thank you. I thought I had to choose repair first, then I “fixed” my issue, but apparently it was not necessary.
# Synology - Backup from Linux
## Introduction
This is to setup a hourly MySQL backups and also a full system backup once a week.
## Synology Configuration
### NFS Configuration
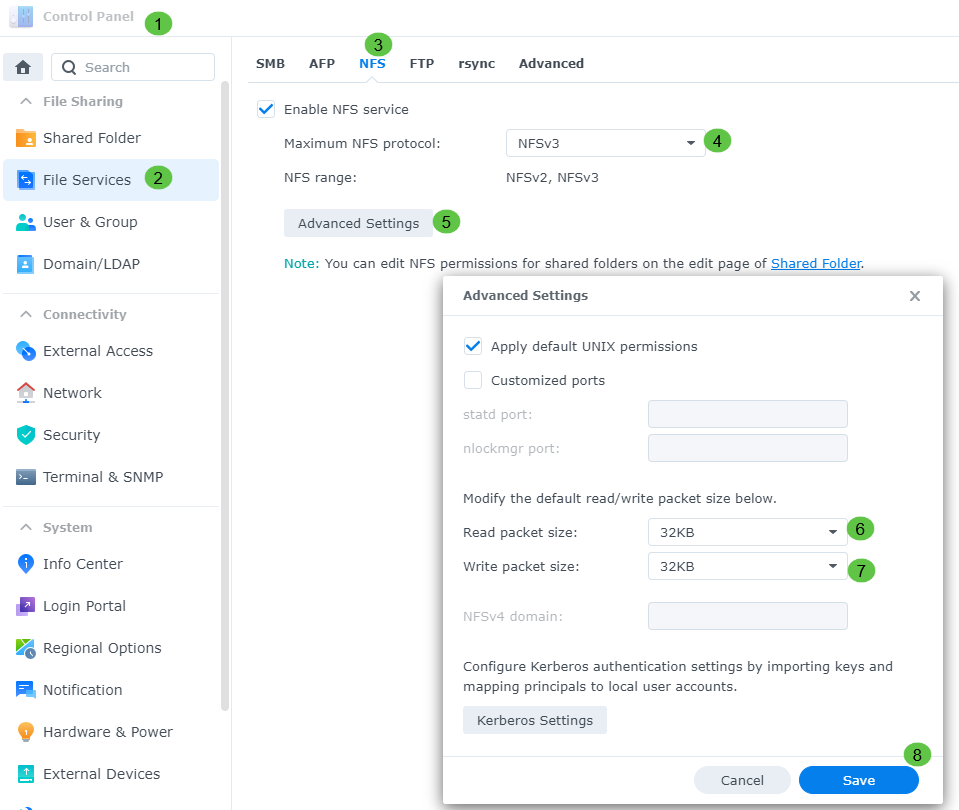
You will need to go to the Control Panel → File Services under the NFS section and turn it on
[](https://docs.thehomestack.io/uploads/images/gallery/2024-09/c5kimage.png)
Then hit APPLY
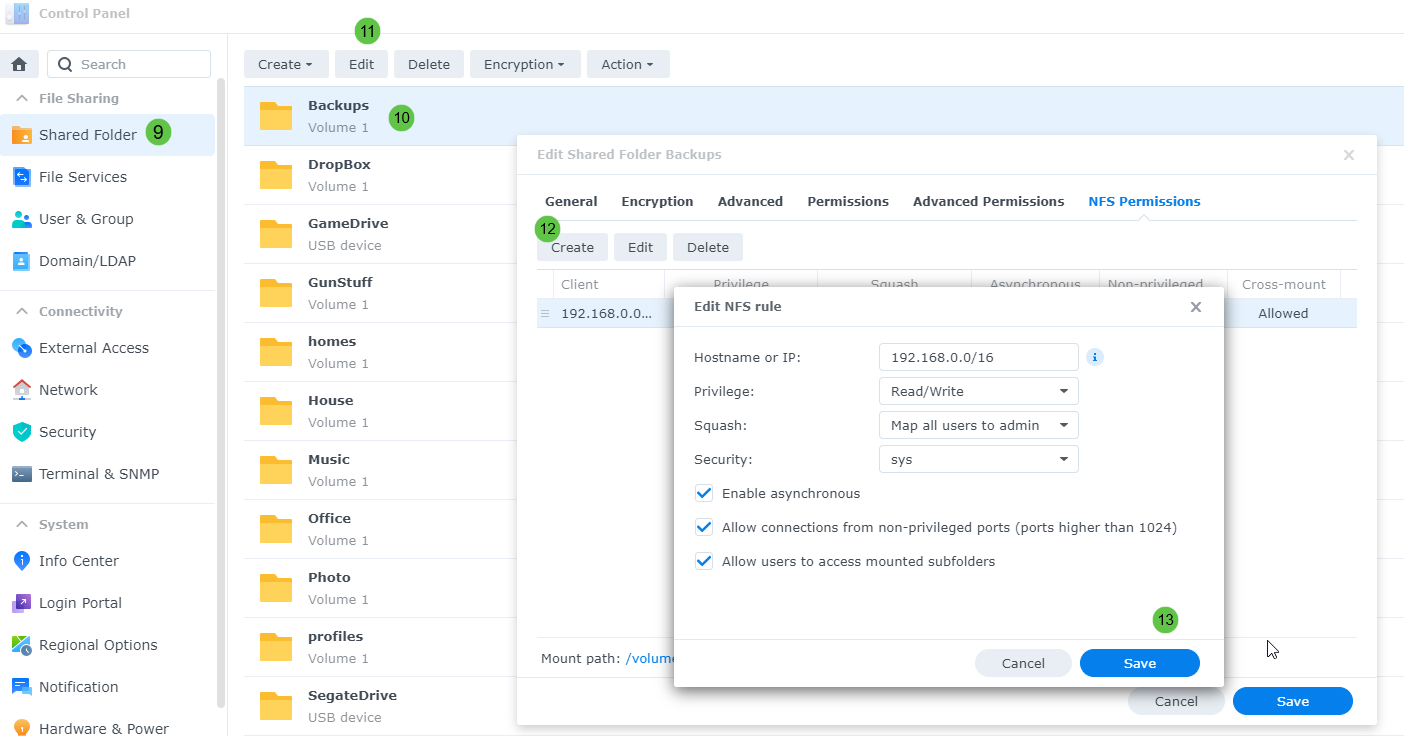
Then go to Shared Folder to setup the share you would like to use for the backups
[](https://docs.thehomestack.io/uploads/images/gallery/2024-09/RHZimage.png)
### Linux Configuration
Now login to the Linux server to setup FSTAB to allow the NFS link to work
Edit the “/etc/fstab“
```shell
#Custom
nas.example.com:/volume1/Backups /mnt/backups nfs auto,defaults 0 0
```
Create the directory for the mount
```shell
mkdir -p /mnt/backups
```
After the mount the new NFS drive
```shell
mount -a -v
systemctl daemon-reload
```
To force kill the new mount
```shell
umount -l /mnt/backups
```
# Synology - Moving Packages Between Volumes DSM 7.0
1. Stop the application(s) via the Synology package center.
2. Make sure that Telnet/SSH is enabled
3. Login to Synology using SSH and [elevate to root](https://www.synology.com/en-global/knowledgebase/DSM/tutorial/General_Setup/How_to_login_to_DSM_with_root_permission_via_SSH_Telnet).
4. Make sure that the volume you are moving the application(s) to have the following folders:
1. @appstore
2. @apphome
3. @appconf
4. @apptemp
1. If they do not you will have to create them in super user mode “*sudo -i*” for all of the following commands
2. ```shell
sudo -i
cd /volume2
mkdir /volume2/@appstore
mkdir /volume2/@apphome
mkdir /volume2/@appconf
mkdir /volume2/@apptemp
```
5. Find the application that you need to move on the correct value
1. Use “ls” against */VolumeX/@appstore* to find your package folder name
2. ```shell
cd /volume1/@appstore
ls -lart
drwxr-xr-x 15 AudioStation AudioStation 4096 Oct 6 22:37 AudioStation
drwxr-xr-x 16 MediaServer MediaServer 4096 Oct 6 22:40 MediaServer
drwxr-xr-x 9 iTunesServer iTunesServer 4096 Oct 6 22:41 iTunesServer
drwxr-xr-x 23 SurveillanceStation SurveillanceStation 4096 Jan 24 17:13 SurveillanceStation
```
3. Use “mv” to move the data between the old and new volume, you may need to create the *@appstore* folder first.
4. ```shell
mv SurveillanceStation /volume2/@appstore/
```
6. Now you will need to adjust Synology and relocate the parameters for the application(s) and where it is now moved to. this is done where the packages configurations live in “*/var/packages*”.
1. ```shell
cd /var/packages/SurveillanceStation
ls -lrt
lrwxrwxrwx 1 root root 33 Oct 6 22:33 var -> /volume1/@appdata/UniversalViewer
lrwxrwxrwx 1 root root 33 Oct 6 22:33 tmp -> /volume1/@apptemp/UniversalViewer
lrwxrwxrwx 1 root root 34 Oct 6 22:33 target -> /volume1/@appstore/UniversalViewer
lrwxrwxrwx 1 root root 33 Oct 6 22:33 home -> /volume1/@apphome/UniversalViewer
lrwxrwxrwx 1 root root 33 Oct 6 22:33 etc -> /volume1/@appconf/UniversalViewer
```
2. Now we have to remove the symbolic links and recreate them to point to volume2 using the “*rm*” to remove and the “*ln -s*” to recreate them.
3. ```shell
rm var tmp target home etc
ln -s /volume2/@appdata/UniversalViewer var
ln -s /volume2/@apptemp/UniversalViewer tmp
ln -s /volume2/@appstore/UniversalViewer target
ln -s /volume2/@apphome/UniversalViewer home
ln -s /volume2/@appconf/UniversalViewer etc
```
4.
7. Repair your application(s) package in the Synology Package Centre.
1. It will automatically re-download and restart
# Synology - Host Unifi for FREE on Synology NAS
All you have to do is ass a scheduled task scripts under tasks and run the following
```bash
docker run -d --name=Unifi-Controller \
-p 3478:3478/udp \
-p 10001:10001/udp \
-p 5514:5514/udp \
-p 8080:8080 \
-p 8443:8443 \
-p 8880:8880 \
-p 8843:8843 \
-e PUID=1026 \
-e PGID=100 \
-e TZ=Europe/London \
-v /volume1/docker/unifi:/config \
--restart always \
ghcr.io/linuxserver/unifi-controller
```
# Synology - Upgrade 1515+ to 1517+
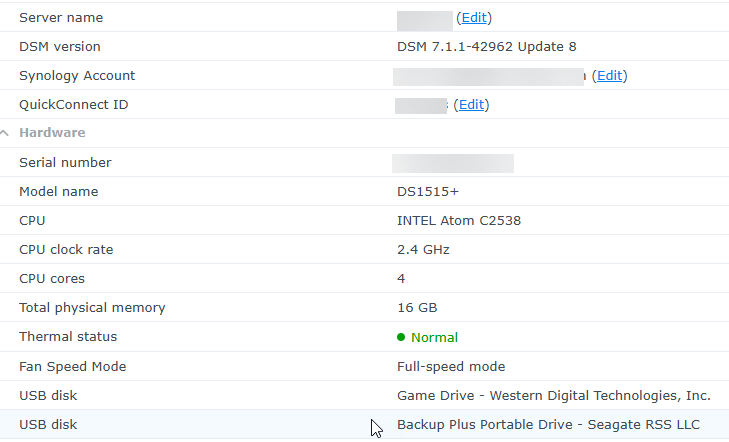
Worked like a charm
[](https://docs.thehomestack.io/uploads/images/gallery/2025-06/6eiimage.png)
[https://github.com/prt1999/Synology\_model\_upgrade](https://github.com/prt1999/Synology_model_upgrade)
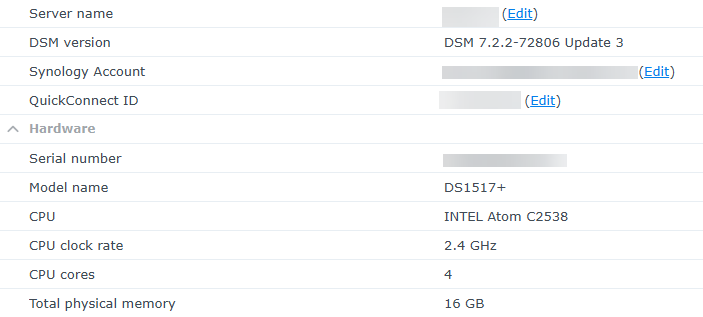
Ran the above process
[](https://docs.thehomestack.io/uploads/images/gallery/2025-06/msoimage.png)
Forum Discussions
[https://xpenology.com/forum/topic/69328-converting-ds1515-into-ds1517-dsm-72/page/3/](https://xpenology.com/forum/topic/69328-converting-ds1515-into-ds1517-dsm-72/page/3/)
[https://xpenology.com/forum/topic/69328-converting-ds1515-into-ds1517-dsm-72/](https://xpenology.com/forum/topic/69328-converting-ds1515-into-ds1517-dsm-72/)
Revert Back to 1515+
Synology DOM module pinout
Plug into the 2nd row, i.e. straight pins, with normal USB assignment.
2 red
4 white
6 green
8 black
# Synology - Flash uboot ROM
This guide describes a method how to restore u-boot if the flash has been completely erased. This situation can arise if there was a power loss during u-boot upgrade or you accidentally deleted the boatloader while playing with the u-boot commands like I did. There are many reasons why the DiskStation fails to boot, but as long as the u-boot bootloader partition is not destroyed, you can repair the flash image using the u-boot serial flash subsystem. This guide is for all who are sure that u-boot has been corrupted and that there is no other way to recover.
The solution is to physically replace the corrupted flash chip and restore its original content. I will be using a Dangerous Prototypes Buspirate for serial console access and to flash the firmware externally onto a brand new flash IC. This of course will void your warranty as you have to replace the old chip with the new one. In case you are not experienced with soldering you will risk destroying the mainboard, but in my opinion this is still better than throwing the bricked unit away. The following steps involve the preparation of the flash.rom image, programming and replacing the old chip. The new installation will be verified with the serial console.
1\. Download and extract firmware image
This guide is for a DS213j, but should work equally on other NAS.
[https://global.download.synology.com/download/DSM/release/6.2/23739/DSM\_DS213j\_23739.pat](https://global.download.synology.com/download/DSM/release/6.2/23739/DSM_DS213j_23739.pat)
The pat file is an uncompressed tar archive: $ tar -xvf DSM\_DS213j\_4458.pat The files we need are:
\- uboot\_DS213jv10.bin: u-boot
\- zImage: kernel
\- rd.bin: initrd
2\. Prepare the flash.rom image
The size of the flash chip on the DS213j is 64Mbit, so we need an 8MB large image. We first recall the flash layout to get the right offsets:
00000000:000bffff RedBoot (uboot) 000c0000:0038ffff zImage 00390000:007cffff rd.gz 007d0000:007dffff vender 007e0000:007effff RedBoot\_Config 007f0000:007fffff FIS\_directory
Create an empty flash image of 8 MB size filled with zeros: $ dd if=/dev/zero of=flash.rom bs=1024 count=8192 Copy the uboot image to the beginning of the file not truncating the rest: $ dd if=uboot\_DS213jv10.bin of=flash.rom conv=notrunc Now copy the kernel image at the right offset. dd cannot directly use hexadecimal values. These have to be converted by the shell: $ dd if=zImage of=flash.rom bs=1 seek=$((0xc0000)) conv=notrunc Next is the initrd image: $ dd if=rd.bin of=flash.rom bs=1 seek=$((0x390000)) conv=notrunc Then comes the vender partition. This is not provided in the download of the firmaware as this is unique to your DiskStation and written only once in the factory. It contains the serial number and the MAC address, which can be found on the sticker at the back of the case. The DiskStation will boot without the vender information, but without the MAC address it will assign a random MAC at each boot. This will annoy DHCP servers as they serve a new IP on every reboot. Automatic firmware updates and the DS Assistant rely on the MAC address as well.
For the next step you will need the serial number and original MAC from the sticker and a hex editor (I use hexeditor). First we create an empty 64 kB vender partition: $ dd if=/dev/zero of=vender.img bs=1024 count=64 The MAC address is stored in the first 6 bytes and the 7th byte contains a checksum. The checksum is calculated by taking the sum of the bytes in the MAC address. The following C program can be used to calculate the checksum. The checksum is stored in an unsigned char, which is not large enough to store the total. It will flow over give the rest, which is larger than multiples of 256 bytes:
\#include <stdio.h> int main() { unsigned char chksum = 0; int i = 0; unsigned char rgAddr\[6\] = {0x00, 0x11, 0x32, 0xFF, 0xFF, 0xFF}; for (i = 0; i < 6; i++) { chksum += rgAddr\[i\]; } printf("Checksum: 0x%X\\n", chksum); return 0; } The first three bytes are the Synology part, the last three bytes needs to be changed to your MAC address. Compile with $ gcc -o checksum mac\_checksum.c This MAC example 00:11:32:FF:FF:FF will give a checksum of 0x40.
Insert these bytes into the image: $ hexeditor -b vender.img 00000000 00 11 32 FF FF FF 40 The serial number is written like this. For example:
SN=1350LAN009999,CHK=999
00000020 53 4e 3d 31 33 35 30 4c 41 4e 30 30 31 39 39 39 00000030 2c 43 48 4b 3d 39 39 39 Use an ascii to hex converter to generate the hex values. The checksum is calculated on next reboot automatically and can be inserted later. We use a dummy of 999 for now. Once u-boot is working again, you can flash the updated vender image from u-boot (see below how to do this). Now insert the vender data into the flash image: $ dd if=vender.img of=flash.rom bs=1 seek=$((0x7d0000)) The flash.rom image is now ready to be flashed onto the chip. The RedBoot\_Config and FIS\_directory partitions are not needed.
3\. Flash the rom image to the new chip
The flash chip on the DS213j is a Micron 25Q064A 13E40 64Mbit serial flash. I bought mine here
[https://hbe-shop.de/Art-2253680-MICRON-N25Q064A13ESE40E-FLASH-SERIELL-64MB-3V-8WSOIC](https://hbe-shop.de/Art-2253680-MICRON-N25Q064A13ESE40E-FLASH-SERIELL-64MB-3V-8WSOIC)

What you also need is a SOIC/DIL 8POL adapter PCB to connect the IC to a breadboard:
[https://hbe-shop.de/Art-1136592-ARIES-08-350000-11-RC-ADAPTER-SOIC-DIL-8POL](https://hbe-shop.de/Art-1136592-ARIES-08-350000-11-RC-ADAPTER-SOIC-DIL-8POL)
For the SPI programmer and 3.3V TTL-USB Level shifter I use a Dangerous Prototypes Buspirate:
[http://dangerousprototypes.com/docs/Bus\_Pirate](http://dangerousprototypes.com/docs/Bus_Pirate)
The Buspirate is a multi purpose debugging and prototyping device that has SPI, JTAG, UART and I2C modes. Solder the IC onto the SOIC adapter and then you can use breadboard to connect the Buspirate with the following circuit ([http://flashrom.org/Bus\_Pirate](http://flashrom.org/Bus_Pirate)):

For the actual programming of the flash.rom image I used flashrom ([http://flashrom.org/Flashrom](http://flashrom.org/Flashrom)), which supports the Buspirate programmer directly: $ sudo flashrom -c "N25Q064..3E" -V -p buspirate\_spi:dev=/dev/ttyUSB0,pullups=on -w flash.rom Now we are set to replace the flash chip on the main board.
4\. Replace the flash chip on main board
This is the most difficult part and if you are inexperienced with a soldering iron you should get some practise by de-soldering IC's from old motherboards or scrap electronics. Did I mention that touching the DiskStation PCB with a soldering iron will void your warranty? To de-solder the flash chip the trick is to apply plenty of solder over all pins. The pins will be connected through a thick layer of solder and this will distribute the heat over the pins and keep the solder liquid long enough. This looks messy at first, but it is then possible to apply heat to both sides of the chip simultaneously and lift the IC from the PCB without damaging the pins. If you were successful in de-soldering the flash, you could even spare yourself the hassle of buying a new chip and flashing the old one. I use de-soldering wick to clean the pins of the IC and the pads on the PCB. Then I remove residue flux from the PCB with residue cleaner or isopropanol using an old toothbrush. With the same technique you have to de-solder the IC from the SOIC adapter. Before soldering the reprogrammed chip back in, make sure the pads are free from old solder and shiny clean. Then fix the chip on the board with tape and apply very little solder to two opposite pins first, and afterwards apply solder to the remaining pins.
5\. Connecting a serial console
Information on how to connect to the serial console can be found here:
[http://www.fr.netbsd.org/ports/sandpoint/instSynology.html](http://www.fr.netbsd.org/ports/sandpoint/instSynology.html)
The serial console of the DS213j is available at the 6 pin jumper next to the 3 pin fan connector. Connect the BusPirate pins GND, MISO and MOSI to the jumper pins 2, 4 and 6.

Pin Function BusPirate
1 3.3 V
2 GND GND
4 TX MISO (RX)
6 RX MOSI (TX)
Start your favourite terminal program and put the BusPirate into UART transparent bridge mode. $ script -f -c "picocom -b 115200 /dev/ttyUSB0" session.log Now it is time to power on the DiskStation and watch the output on the console. If the re-flashing was successful, you should see u-boot loading kernel and initrd images. If you still have DSM installed on the hard drives, the DiskStation should boot normally now, otherwise it will stop at the initrd prompt. You could use the DS Assistant to do a fresh DSM install. Congratulations, you are almost there!
6\. Flashing the vendor image using u-boot
The DiskStation will complain that the serial number checksum does not match the one provided (999) and prints the correct checksum on the console. Write it down and update the vender.img with the correct serial number using hexeditor.
EDIT: The checksum of the 13 digit serial number equals to the sum of the individual character bytes, for example SN=1350LAN009999,CHK=744
Now reboot and interrupt the boot process with CTRL-C to get to the u-boot prompt. Copy the vender.img to a TFTP server and set the Diskstation IP with ipaddr and the TFTP server address with serverip. Then transfer the image to memory address 0x2000000: Marvell>> setenv ipaddr 192.168.1.50 Marvell>> setenv serverip 192.168.1.10 Marvell>> tftpboot 0x2000000 vender.img Now initialise the flash subsystem, erase mtd3 partition and write the 64 kB vender.img to the correct address 0x7d0000: Marvell>> sf probe 0 Marvell>> sf erase 0x7d0000 10000 Marvell>> sf write 0x2000000 0x7d0000 0x10000 Marvell>> reset The DiskStation is now restored to a fully working condition. If further problems arise, it is always a good idea to connect the serial console first to see if u-boot is still working. From here you can manually flash new kernel and initrd images or fix problems with the network.
Have a good day!
Alexander
[https://community.synology.com/enu/forum/17/post/69287](https://community.synology.com/enu/forum/17/post/69287)
# TrueNAS
TrueNAS setup, mounts and backups.
# TrueNAS - Login PS1 Prompt with Warning and Bash Colors
### Change the colors of the shell do the following steps:
#### Step 1:
Change the shell on the user in `Credentials/Users` and then Edit the user you are using to log in and change the following.
[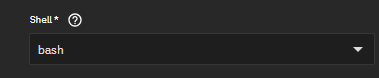](https://docs.thehomestack.io/uploads/images/gallery/2026-03/image.png)
#### Step 2:
Add the following entries to create the default files for any login
Creating Aliases
```bash
sudo cat > /etc/profile.d/custom-aliases.sh << EOF
# Common interactive aliases for all users
alias rm='rm -i'
alias cp='cp -i'
alias mv='mv -i'
alias vi='vim'
alias tailf='tail -f'
EOF
```
Server Warning
```bash
sudo tee /etc/profile.d/custom-prod-warning.sh > /dev/null << 'EOF'
# /etc/profile.d/custom-prod-warning.sh
# Production warning banner – only for real interactive logins
# 1. Exit immediately if this is not an interactive shell
[[ $- != *i* ]] && return
# 2. Exit if we don't have a real terminal
[[ -t 0 && -t 1 ]] || return
# 3. Exit if SSH is running a forced command (rsync, scp, ansible, etc.)
# OpenSSH sets SSH_ORIGINAL_COMMAND in these cases
[[ -n "${SSH_ORIGINAL_COMMAND:-}" ]] && return
# --- Safe to show the banner from here ---
RED='\033[1;31m'
YELLOW='\033[1;33m'
NC='\033[0m'
echo
if command -v figlet >/dev/null 2>&1; then
figlet -f big "PRODUCTION" | while IFS= read -r line; do
printf '%b%s%b\n' "$RED" "$line" "$NC"
done
figlet -f big "SERVER" | while IFS= read -r line; do
printf '%b%s%b\n' "$RED" "$line" "$NC"
done
else
echo -e "${RED}***** PRODUCTION SERVER!! *****${NC}"
fi
echo
echo -e "${YELLOW} *** EXTREME CAUTION REQUIRED ***${NC}"
echo -e "${RED}This is a LIVE PRODUCTION system.${NC}"
echo -e "${RED}Unauthorized access is strictly prohibited.${NC}"
echo -e "${RED}All activity is logged and monitored.${NC}"
echo -e "${YELLOW}Think twice before running commands!${NC}"
echo
EOF
```
Creating Colorful Prompts
```bash
sudo tee /etc/profile.d/custom-prompt-and-colors.sh > /dev/null << 'EOF'
# Custom LS_COLORS and improved multi-line colored prompt
# Vibrant LS_COLORS (directories bold blue on gray, etc.)
LS_COLORS='rs=0:di=01;44:ln=01;36:mh=00:pi=40;33:so=01;35:do=01;35:bd=40;33;01:cd=40;33;01:or=40;31;01:su=37;41:sg=30;43:ca=30;41:tw=30;42:ow=34;42:st=37;44:ex=01;32:*.tar=01;31:*.tgz=01;31:*.arj=01;31:*.taz=01;31:*.lzh=01;31:*.lzma=01;31:*.tlz=01;31:*.txz=01;31:*.zip=01;31:*.z=01;31:*.Z=01;31:*.dz=01;31:*.gz=01;31:*.lz=01;31:*.xz=01;31:*.bz2=01;31:*.bz=01;31:*.tbz=01;31:*.tbz2=01;31:*.tz=01;31:*.deb=01;31:*.rpm=01;31:*.jar=01;31:*.rar=01;31:*.ace=01;31:*.zoo=01;31:*.cpio=01;31:*.7z=01;31:*.rz=01;31:*.jpg=01;35:*.jpeg=01;35:*.gif=01;35:*.bmp=01;35:*.pbm=01;35:*.pgm=01;35:*.ppm=01;35:*.tga=01;35:*.xbm=01;35:*.xpm=01;35:*.tif=01;35:*.tiff=01;35:*.png=01;35:*.svg=01;35:*.svgz=01;35:*.mng=01;35:*.pcx=01;35:*.mov=01;35:*.mpg=01;35:*.mpeg=01;35:*.m2v=01;35:*.mkv=01;35:*.ogm=01;35:*.mp4=01;35:*.m4v=01;35:*.mp4v=01;35:*.vob=01;35:*.qt=01;35:*.nuv=01;35:*.wmv=01;35:*.asf=01;35:*.rm=01;35:*.rmvb=01;35:*.flc=01;35:*.avi=01;35:*.fli=01;35:*.flv=01;35:*.gl=01;35:*.dl=01;35:*.xcf=01;35:*.xwd=01;35:*.yuv=01;35:*.cgm=01;35:*.emf=01;35:*.axv=01;35:*.anx=01;35:*.ogv=01;35:*.ogx=01;35:*.aac=00;36:*.au=00;36:*.flac=00;36:*.mid=00;36:*.midi=00;36:*.mka=00;36:*.mp3=00;36:*.mpc=00;36:*.ogg=00;36:*.ra=00;36:*.wav=00;36:*.axa=00;36:*.oga=00;36:*.spx=00;36:*.xspf=00;36:'
export LS_COLORS
# Build a combined OS_NAME: Debian base + TrueNAS SCALE build
if [ -f /etc/os-release ]; then
. /etc/os-release
OS_NAME="${PRETTY_NAME}"
fi
if [ -f /etc/version ]; then
TRUENAS_VER="TrueNAS SCALE ($(cat /etc/version 2>/dev/null))"
OS_NAME="${OS_NAME} / ${TRUENAS_VER}"
fi
export OS_NAME
# Only set up the fancy colored prompt in real interactive terminals
if [[ $- == *i* ]] && [[ -t 0 && -t 1 ]] && [[ -z "${SSH_ORIGINAL_COMMAND:-}" ]]; then
# Color and style variables
RESET=$(tput sgr0)
BOLD=$(tput bold)
BG_GRAY=$(tput setab 8)
FG_RED=$(tput setaf 1)
FG_MAGENTA=$(tput setaf 5)
FG_GREEN=$(tput setaf 2)
FG_CYAN=$(tput setaf 6)
# Multi-line prompt – all non-printing sequences wrapped in \[ \]
PS1="\n"
PS1+="\[${BOLD}${BG_GRAY}${FG_RED}\]\u"
PS1+="\[${FG_MAGENTA}\]@"
PS1+="\[${FG_RED}\]\`hostname\`"
PS1+="\[${FG_GREEN}\] : \`uname\` : "
PS1+="\[${FG_CYAN}\]\d \t : \${PLANTID:+\$PLANTID }"
PS1+="\[${RESET}\]\n"
PS1+="\[${FG_CYAN}\][\w]"
PS1+="\[${RESET}${BOLD}\] \\$ \[${RESET}\]"
export PS1
fi
EOF
```
#### Result
[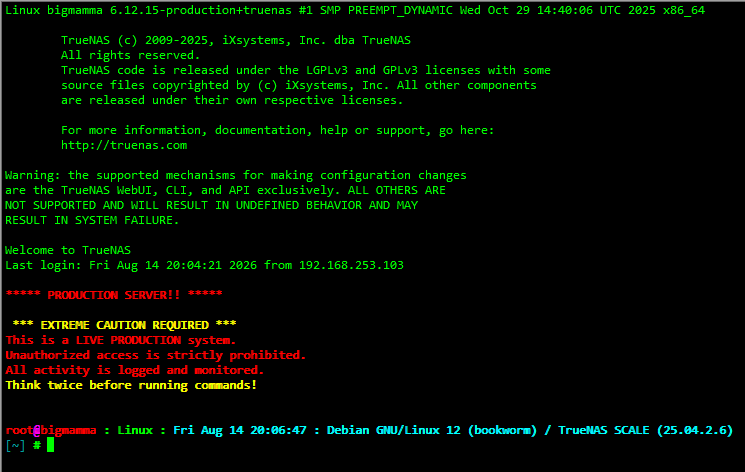](https://docs.thehomestack.io/uploads/images/gallery/2026-08/Lmbimage.png)
# TrueNAS - SCALE Create a local Backup and Send to S3 Buckets
To automate backing up your TrueNAS configuration directly to Amazon S3 or any S3-compatible cloud storage, you need to create a **local backup script** and pair it with a **TrueNAS Cloud Sync task**
TrueNAS automatically saves daily configuration databases locally to your system dataset, but exporting it safely off-site requires grabbing the full archive (with the secret seed) via a middleware command (`midclt`).
#### Step 1: Create a Local Dataset and Script
First, create an isolated directory on your storage pool where TrueNAS will output the configuration files before uploading them. [[1](https://www.youtube.com/watch?v=I7oH-QE_TSA)]
1. Navigate to **Storage** > **Datasets** and click **Add Dataset**. Name it something distinct like `system-backups`.
2. Open a shell or connection to your TrueNAS system. Create a script named `backup_config.sh` inside that dataset folder:```bash
nano /mnt/YOUR_POOL/system-backups/backup_config.sh
```
3. Paste the following script, which requests the configuration archive from the TrueNAS API engine (`midclt`), saves it with a timestamp, and purges backups older than 30 days to avoid clutter:```bash
#!/bin/bash
BACKUP_DIR="/mnt/YOUR_POOL/system-backups"
DATE=$(date +%Y%m%d-%H%M%S)
FILENAME="truenas-config-${DATE}.tar"
# 1. Request the configuration download job from the SCALE API
JOB_DATA=$(midclt call core.download "config.save" '[{"secretseed": true}]' "${FILENAME}")
# 2. Extract the download path cleanly using jq (returns: /_download/JOB_ID?auth_token=TOKEN)
DOWNLOAD_PATH=$(echo "$JOB_DATA" | jq -r '.[1]')
# 3. Pull the actual file directly using the exact path provided by the API
curl -s -k --output "${BACKUP_DIR}/${FILENAME}" "http://127.0.0.1${DOWNLOAD_PATH}"
# 4. Delete backups older than 30 days
find "${BACKUP_DIR}" -name "truenas-config-*.tar" -type f -mtime +30 -delete
```
4. Make the script executable:```
chmod +x /mnt/YOUR_POOL/system-backups/backup_config.sh
```
#### Step 2: Automate the Script via Cron Job
Schedule TrueNAS to execute this script automatically every day before sending the files offsite.
1. Navigate to **System** > **Advanced Settings** >**Cron Jobs** and click **Add**.
2. **Description**: `Generate Daily Config Backup Archive`
3. **Command**: `/mnt/YOUR_POOL/system-backups/backup_config.sh`
4. **Run As User**: `root`
5. **Schedule**: Set it to run daily (e.g., Every day at `02:00` AM).
6. Click **Save**.
#### Step 3: Link Your S3 Bucket Credentials
Now, prepare TrueNAS to communicate securely with your S3 bucket. [[1](https://www.truenas.com/docs/scale/23.10/gettingstarted/configure/setupbackupscale/)]
1. Go to **Credentials** > **Backup Credentials** > **Cloud Credentials** and click **Add**.
2. Name the credential (e.g., `AWS-S3-Backup`).
3. Under **Provider**, select **Amazon S3** (or generic S3 if using Wasabi, Backblaze B2, or MinIO).
4. Paste your cloud account's **Access Key ID** and **Secret Access Key**.
5. Click **Verify** to confirm the handshake with AWS is successful, then click **Save**
#### Step 4: Configure the Offsite S3 Cloud Sync Task
The final step uses TrueNAS's built-in replication tools to synchronize your backup folder to the cloud. [[1](https://www.youtube.com/watch?v=wwt9dDhsgJw)]
1. Navigate to **Data Protection** > **Cloud Sync Tasks** and click **Add**.
2. **Description**: `Sync Config Backups to S3`
3. **Direction**: Select **PUSH** (this uploads data *to* the cloud).
4. **Transfer Mode**: Select **SYNC** (mirrors your local folder; automatically handles remote file deletion when files age out locally).
5. **Directory/Files**: Choose your local path: `/mnt/YOUR_POOL/system-backups`.
6. **Credential**: Select the `AWS-S3-Backup` credential you created in Step 3.
7. **Bucket**: Select your designated target S3 bucket from the auto-populated drop-down menu.
8. **Schedule**: Set this to run daily, at least one hour *after* the local Cron Job (e.g., Every day at `03:00` AM).
9. Click **Save**.
💡 Pro-Tip: S3 Bucket Security
Because TrueNAS configuration files contain your system's password hashes, API tokens, and private networking configurations, it is highly recommended to enable **Server-Side Encryption (SSE-S3)** and **Bucket Versioning** directly inside your AWS S3 Console. This adds a layer of defense against accidental deletion or ransomware targeting your NAS shares.
# TrueNAS - Custom Mounts
**Last verified:** October 2026 against the TrueNAS Community Edition 25.10 documentation (Init/Shutdown Scripts). See Sources.
TrueNAS does not keep manual `mount` commands or `/etc/fstab` edits across reboots. To mount NFS shares from another server (for example a Synology or another NAS) every time TrueNAS starts, run a mount script as a **Post Init** Init/Shutdown script. Use this when apps or tasks on TrueNAS need data that lives on another NAS.
### Prerequisites
- TrueNAS Community Edition (formerly SCALE). UI paths below match 25.10.
- An NFS export on the remote server that allows this TrueNAS host to mount it.
- A pool on TrueNAS to hold the script and the mount points (`/mnt//...`).
- Admin access to the TrueNAS web UI and a shell (System > Shell or SSH).
### 1) Create the mount script
Store the script on a pool so it survives updates, for example `/mnt//scripts/custom_mount.sh`:
```bash
#!/bin/bash
# Mount NFS exports from another NAS after TrueNAS boots.
mount_nfs() {
local src="$1" dst="$2"
mkdir -p "$dst"
mountpoint -q "$dst" || mount -t nfs "$src" "$dst"
}
mount_nfs :/ /mnt//
mount_nfs :/ /mnt//
```
Make it executable. The Init/Shutdown script must have the execute bit set:
```bash
chmod +x /mnt//scripts/custom_mount.sh
```
### 2) Add it as a Post Init script
1. Go to **System > Advanced Settings**. On the **Init/Shutdown Scripts** widget, click **Add**.
2. **Description:** for example `Mount NFS shares`.
3. **Type:** **Script**, then select `/mnt//scripts/custom_mount.sh`. (**Command** with the script path also works.)
4. **When:** **Post Init**.
5. **Enabled:** checked.
6. **Timeout:** the default is 10 seconds. Raise it (for example to 60) if you mount several shares or the remote NAS is slow to answer.
7. Click **Save**.
### 3) Verify
Run the script once by hand, or reboot TrueNAS, then check the mounts:
```bash
sudo /mnt//scripts/custom_mount.sh
findmnt -t nfs,nfs4
df -h | grep
```
Each share should be listed at its `/mnt//` path.
### Troubleshooting / notes
- **Nothing is mounted after a reboot:** make sure the script is executable and starts with `#!/bin/bash` (otherwise it runs under dash). Then check that the remote NAS was reachable at boot and that the Timeout was long enough.
- **Permission denied / access denied by server:** allow the TrueNAS IP in the NFS export rules on the remote NAS.
- The `mountpoint -q` check stops the script from mounting the same share twice when you run it again by hand.
- For an app that needs the data, point the app at the mounted path (`/mnt//`) after the share is mounted.
#### Sources
- [TrueNAS docs: Managing Init/Shutdown Scripts (25.10)](https://www.truenas.com/docs/scale/25.10/scaletutorials/systemsettings/advanced/manageinitshutdownscale/)
- [TrueNAS docs: Advanced Settings Screen (25.10)](https://www.truenas.com/docs/scale/25.10/scaleuireference/systemsettings/advancedsettingsscreen/)
- [TrueNAS API: initshutdownscript.create (timeout default 10 s)](https://api.truenas.com/v25.10/api_methods_initshutdownscript.create.html)
# TrueNAS - Backup Config to S3
**Last verified:** October 2026 against the TrueNAS Community Edition 25.10 documentation and AWS IAM/S3 documentation. See Sources.
This guide sets up two off-site backups from TrueNAS to Amazon S3: a daily archive of the **TrueNAS system configuration**, and the **app data / Docker stacks** folder. Both are uploaded with TrueNAS **Cloud Sync Tasks**. Use it so you can rebuild the NAS configuration and apps if the boot device or the system fails.
The configuration archive contains the **password secret seed** (`pwenc_secret`) and the config database. Together they decrypt stored credentials (cloud credentials, SSH keys, certificates, SMB hashes and so on). Keep the backups in a **private bucket**, enable **Remote Encryption** on the Cloud Sync task (step 5), and restrict the local folder to root.
### Prerequisites
- TrueNAS Community Edition (formerly SCALE). UI paths below match 25.10.
- An AWS account with a private S3 bucket per backup (``, ``), or one bucket with separate folders. Block Public Access stays on.
- A dataset for local archives, for example `/mnt//system-backups`, and the app data folder, for example `/mnt//`.
- Admin access to the TrueNAS web UI.
### 1) Create an IAM user for TrueNAS
In AWS IAM, create a dedicated user (for example ``) with an access key. Give it access only to the backup bucket(s). Repeat the bucket lines for each bucket:
```json
{
"Version": "2012-10-17",
"Statement": [
{
"Effect": "Allow",
"Action": ["s3:ListBucket", "s3:GetBucketLocation"],
"Resource": "arn:aws:s3:::"
},
{
"Effect": "Allow",
"Action": ["s3:GetObject", "s3:PutObject", "s3:DeleteObject"],
"Resource": "arn:aws:s3:::/*"
}
]
}
```
Store the Access Key ID and Secret Access Key in a password manager. Do not put them in scripts or documentation.
### 2) Add the S3 cloud credential in TrueNAS
1. Go to **Credentials > Backup Credentials**. On **Cloud Credentials**, click **Add**.
2. **Provider:** Amazon S3. **Name:** for example `AWS S3 Backup`.
3. **Access Key ID:** ``. **Secret Access Key:** ``.
4. Leave **Endpoint URL** empty for AWS. Set **Region** to the bucket region (for example ``).
5. Click **Verify Credentials**, then **Save**.
### 3) Create the config backup script
Save this as `/mnt//system-backups/backup_config.sh`:
```bash
#!/bin/bash
# Save the TrueNAS config database and secret seed to a dated archive.
BACKUP_DIR="/mnt//system-backups"
DATE=$(date +%Y%m%d-%H%M%S)
FILENAME="truenas-config-${DATE}.tar"
tar -cf "${BACKUP_DIR}/${FILENAME}" -C /data freenas-v1.db pwenc_secret
if [ ! -s "${BACKUP_DIR}/${FILENAME}" ]; then
echo "ERROR: backup file is empty or missing" >&2
exit 1
fi
chmod 600 "${BACKUP_DIR}/${FILENAME}"
# Keep 30 days of local archives
find "${BACKUP_DIR}" -name "truenas-config-*.tar" -type f -mtime +30 -delete
```
```bash
chmod 700 /mnt//system-backups/backup_config.sh
```
### 4) Schedule the script with a cron job
1. Go to **System > Advanced Settings**. On **Cron Jobs**, click **Add**.
2. **Description:** `Daily config backup archive`. **Command:** `/mnt//system-backups/backup_config.sh`.
3. **Run As User:** `root`. **Schedule:** daily, for example `0 2 * * *` (02:00).
4. Leave **Hide Standard Error** cleared so failures are reported. Check **Enabled** and click **Save**.
### 5) Create the Cloud Sync tasks
Go to **Data Protection > Cloud Sync Tasks** and click **Add**. Create one task per source:
| Setting | Config backup | App data / stacks |
|---|
| Credential | The S3 credential from step 2 | Same |
| Direction / Transfer Mode | PUSH / SYNC (or COPY, see notes) | PUSH / SYNC |
| Directory/Files | `/mnt//system-backups` | `/mnt//` |
| Bucket / Folder | `` / `/system-backups` | `` / `/` |
| Schedule | After the cron job, for example 02:15 daily | Daily, for example 00:00 |
| Advanced Options | **Remote Encryption** on (Encryption Password + Salt) | Remote Encryption recommended. Follow Symlinks only if the stacks use them. |
Save the Remote Encryption password and salt in your password manager. Without them the uploaded files cannot be restored.
### 6) Verify
1. Run the script once in **System > Shell** and check that a new archive appears:
```bash
sudo /mnt//system-backups/backup_config.sh
ls -lh /mnt//system-backups/
```
2. On **Data Protection > Cloud Sync Tasks**, click **Run Now** on each task (you can use **Dry Run** first). The state should show **SUCCESS**.
3. In the AWS S3 console, confirm the objects exist in each bucket and folder.
### Troubleshooting / notes
- **SYNC vs COPY:** SYNC makes the bucket match the source, so archives the script deletes after 30 days are deleted in S3 too. Use COPY plus an S3 lifecycle rule if you want longer retention in S3.
- **Official config export:** the supported manual method is **System > Advanced Settings > Manage Configuration > Download File** with **Export Password Secret Seed** selected. Do this before upgrades. The script automates a similar archive. Restore with **Manage Configuration > Upload File**.
- **Credential errors:** check the IAM policy bucket names and the Region, then click **Verify Credentials** again.
- **Glacier:** Cloud Sync cannot delete objects that were moved to S3 Glacier / Deep Archive.
- **Stopped apps:** stop or quiesce apps with databases before backup, or use **Use Snapshot** on the task, to get consistent copies.
#### Sources
- [TrueNAS docs: Managing the System Configuration (25.10)](https://www.truenas.com/docs/scale/25.10/scaletutorials/systemsettings/advanced/managesysconfig/)
- [TrueNAS docs: Advanced Settings Screen, Cron Jobs and Manage Configuration (25.10)](https://www.truenas.com/docs/scale/25.10/scaleuireference/systemsettings/advancedsettingsscreen/)
- [TrueNAS docs: Adding Cloud Credentials (25.10)](https://www.truenas.com/docs/scale/25.10/scaletutorials/credentials/backupcredentials/addcloudcredentials/)
- [TrueNAS docs: Cloud Sync Tasks, incl. Remote Encryption (25.10)](https://www.truenas.com/docs/scale/25.10/scaletutorials/dataprotection/cloudsynctasks/)
- [AWS: Amazon S3 policy examples](https://docs.aws.amazon.com/AmazonS3/latest/userguide/example-bucket-policies.html)
- [AWS: Blocking public access to S3 storage](https://docs.aws.amazon.com/AmazonS3/latest/userguide/access-control-block-public-access.html)